
Field Service
Using Android and iOS Mobile
Applications
Field Service
Using Android and iOS Mobile Applications
F75117-07
Copyright © 2003, 2024, Oracle and/or its affiliates. All rights reserved
Authors: The Field Service Information Development Team
This software and related documentation are provided under a license agreement containing restrictions on use and disclosure and are protected
by intellectual property laws. Except as expressly permitted in your license agreement or allowed by law, you may not use, copy, reproduce, translate,
broadcast, modify, license, transmit, distribute, exhibit, perform, publish, or display in any part, in any form, or by any means. Reverse engineering,
disassembly, or decompilation of this software, unless required by law for interoperability, is prohibited.
The information contained herein is subject to change without notice and is not warranted to be error-free. If you find any errors, please report
them to us in writing.
If this is software or related documentation that is delivered to the U.S. Government or anyone licensing it on behalf of the U.S. Government, the
following notice is applicable:
U.S. GOVERNMENT END USERS: Oracle programs, including any operating system, integrated software, any programs installed on the hardware,
and/or documentation, delivered to U.S. Government end users are "commercial computer software" pursuant to the applicable Federal Acquisition
Regulation and agency-specific supplemental regulations. As such, use, duplication, disclosure, modification, and adaptation of the programs,
including any operating system, integrated software, any programs installed on the hardware, and/or documentation, shall be subject to license
terms and license restrictions applicable to the programs. No other rights are granted to the U.S. Government.
This software or hardware is developed for general use in a variety of information management applications. It is not developed or intended for
use in any inherently dangerous applications, including applications that may create a risk of personal injury. If you use this software or hardware
in dangerous applications, then you shall be responsible to take all appropriate fail-safe, backup, redundancy, and other measures to ensure its safe
use. Oracle Corporation and its affiliates disclaim any liability for any damages caused by use of this software or hardware in dangerous applications.
Oracle and Java are registered trademarks of Oracle Corporation and/or its affiliates. Other names may be trademarks of their respective owners.
Intel and Intel Xeon are trademarks or registered trademarks of Intel Corporation. All SPARC trademarks are used under license and are trademarks or
registered trademarks of SPARC International, Inc. AMD, Opteron, the AMD logo, and the AMD Opteron logo are trademarks or registered trademarks
of Advanced Micro Devices. UNIX is a registered trademark of The Open Group.
This software or hardware and documentation may provide access to or information about content, products, and services from third parties. Oracle
Corporation and its affiliates are not responsible for and expressly disclaim all warranties of any kind with respect to third-party content, products, and
services unless otherwise set forth in an applicable agreement between you and Oracle. Oracle Corporation and its affiliates will not be responsible
for any loss, costs, or damages incurred due to your access to or use of third-party content, products, or services, except as set forth in an applicable
agreement between you and Oracle.
The business names used in this documentation are fictitious, and are not intended to identify any real companies currently or previously in existence.

Field Service
Using Android and iOS Mobile Applications
Contents
Preface .................................................................................................................................. i
1
Using Oracle Field Service Mobile Application
1
Overview ............................................................................................................................................................................................ 1
Redwood Theme ............................................................................................................................................................................. 2
Capture Images With In-App Camera ....................................................................................................................................... 6
2
Install the Mobile Application
9
Install Oracle Field Service App for Android ............................................................................................................................ 9
Install Oracle Field Service App for iOS .................................................................................................................................... 9
3
Configure the Mobile Application
11
Configure Your Instance of Oracle Field Service .................................................................................................................... 11
Change Instance ............................................................................................................................................................................ 11
Upgrade the Installed Android and iOS Apps ........................................................................................................................ 12
Simplified Login ............................................................................................................................................................................. 13
Log In Using SSO .......................................................................................................................................................................... 14
Instance Loading Issues .............................................................................................................................................................. 14
Single Sign-On on the Mobile Application .............................................................................................................................. 15
Biometric ID Authentication ....................................................................................................................................................... 15
Face ID Authentication ............................................................................................................................................................... 20
Activate or Deactivate Coordinate Gathering ........................................................................................................................ 23
Conditions for Gathering Coordinates .................................................................................................................................... 24
Mobile Application Specifics ...................................................................................................................................................... 24
4
Collaboration Notifications in the Mobile Application
25
Collaboration Notifications in iOS App .................................................................................................................................... 25
About Collaboration Notifications in Android Devices ........................................................................................................ 26
5
Disabling Route Activation
35
Overview of the Disable Route Activation Feature ............................................................................................................... 35

Field Service
Using Android and iOS Mobile Applications
Route Activation Messages ........................................................................................................................................................ 35
Enable Location Services ............................................................................................................................................................ 36
6
Using the Mobile Application
37
Launch the Android App Using a Direct Link ........................................................................................................................ 37
Search Inventory with Barcode Scanner ................................................................................................................................. 37
Browse Local Files Support in Native Application ................................................................................................................ 39
......................................................................................................................................................................................................... 40
Download Files From Android Devices ................................................................................................................................... 42
Print Files From the Mobile App .............................................................................................................................................. 43
Available Storage Notification When Low .............................................................................................................................. 44
Location Permissions Notifications ......................................................................................................................................... 45
Set Camera Permissions to Use Barcode Scanner ............................................................................................................... 46
Launch Camera from a Custom Plug-In ................................................................................................................................. 47
Work with Multiple Barcode Scanner ...................................................................................................................................... 47
Save Image Metadata from Camera Images ......................................................................................................................... 48
Change the Name of Your Mobile Instance ........................................................................................................................... 49
Create Shortcuts to Mobile Instances ..................................................................................................................................... 49
Prompt Mobile Application Users to Provide Rating and Feedback .................................................................................. 51
Prompt Mobile Application Users to Upgrade Mobile Application from Previous Versions ......................................... 57
Troubleshoot Your Mobile Application .................................................................................................................................... 60

Field Service
Using Android and iOS Mobile Applications
Preface
Preface
This preface introduces information sources that can help you use the application and this guide.
Using Oracle Applications
To find guides for Oracle Applications, go to the Oracle Help Center.
Documentation Accessibility
For information about Oracle's commitment to accessibility, visit the Oracle Accessibility Program website.
Videos included in this guide are provided as a media alternative for text-based topics also available in this guide.
Diversity and Inclusion
Oracle is fully committed to diversity and inclusion. Oracle respects and values having a diverse workforce that increases
thought leadership and innovation. As part of our initiative to build a more inclusive culture that positively impacts our
employees, customers, and partners, we're working to remove insensitive terms from our products and documentation.
We're also mindful of the necessity to maintain compatibility with our customers' existing technologies and the need to
ensure continuity of service as Oracle's offerings and industry standards evolve. Because of these technical constraints,
our effort to remove insensitive terms is ongoing and will take time and external cooperation.
Contacting Oracle
Access to Oracle Support
Customers can access electronic support through Oracle Support. For information, visit My Oracle Support or visit
Accessible Oracle Support if you are hearing impaired.
Comments and Suggestions
Please give us feedback about Oracle Applications Help and guides. Please take one of the following surveys:
• For web-based user guide, Web-based User Guide Survey
• For tutorial feedback, Tutorial Survey
i

Field Service
Using Android and iOS Mobile Applications
Preface
ii

Field Service
Using Android and iOS Mobile Applications
Chapter 1
Using Oracle Field Service Mobile Application
1 Using Oracle Field Service Mobile
Application
Overview
The Oracle Field Service for Android app uses a native implementation of Oracle Field Service Mobility in the
application. This application is enhanced to improve the collection of resource geocoordinates using their mobile device
in near real-time. The Mobility option of the application is configured in the same way as Oracle Field Service Mobility.
You can use the mobile app to find the location and track the travel patterns of a mobile resource. The mobile app is
available on Google Play services.
This section discusses how to download, install and run the mobile app on devices.
In case you use Mobile Device Management (MDM) software, you should modify the instructions in accordance with
MDM software.
Your mobile device must satisfy the following criteria to run the Oracle Field Service Mobile application:
• The mobile application must be using a supported release.
Note: For the most recent Browser Support Policy, see Browser Support Policy.
• Location services are available and enabled in High Accuracy mode (use GPS, WLAN, and mobile network to
determine location).
Security Notes
• Information Access — Oracle Field Service Mobile doesn't change customer or user sensitive information
storage against existing secure storage which is implemented in Oracle Field Service.
• Authentication — The feature does not require any additional user authentication against authentication which
is implemented in Oracle Field Service.
• Communication
◦
The application uses https protocol for any communication out of device
◦
Does not support self-signed certificates
◦
Obtains access token using secured Oracle Field Service API
• Device Security
◦
The application does not manage or control any security related device options and does not require any
specific options
◦
It is responsibility of client to set reasonable secure options of the device: set password for unlock device,
encrypt device, disable any developer mode options, and so on
◦
It is responsibility of client to verify any security tools for compatibility with the application
1
Field Service
Using Android and iOS Mobile Applications
Chapter 1
Using Oracle Field Service Mobile Application
Hardware Notes
WiFi-only devices: Oracle Field Service Cloud
Redwood Theme
Both iOS and Android apps have new user interfaces based on Redwood styles.
These pages now appear in the Redwood theme:
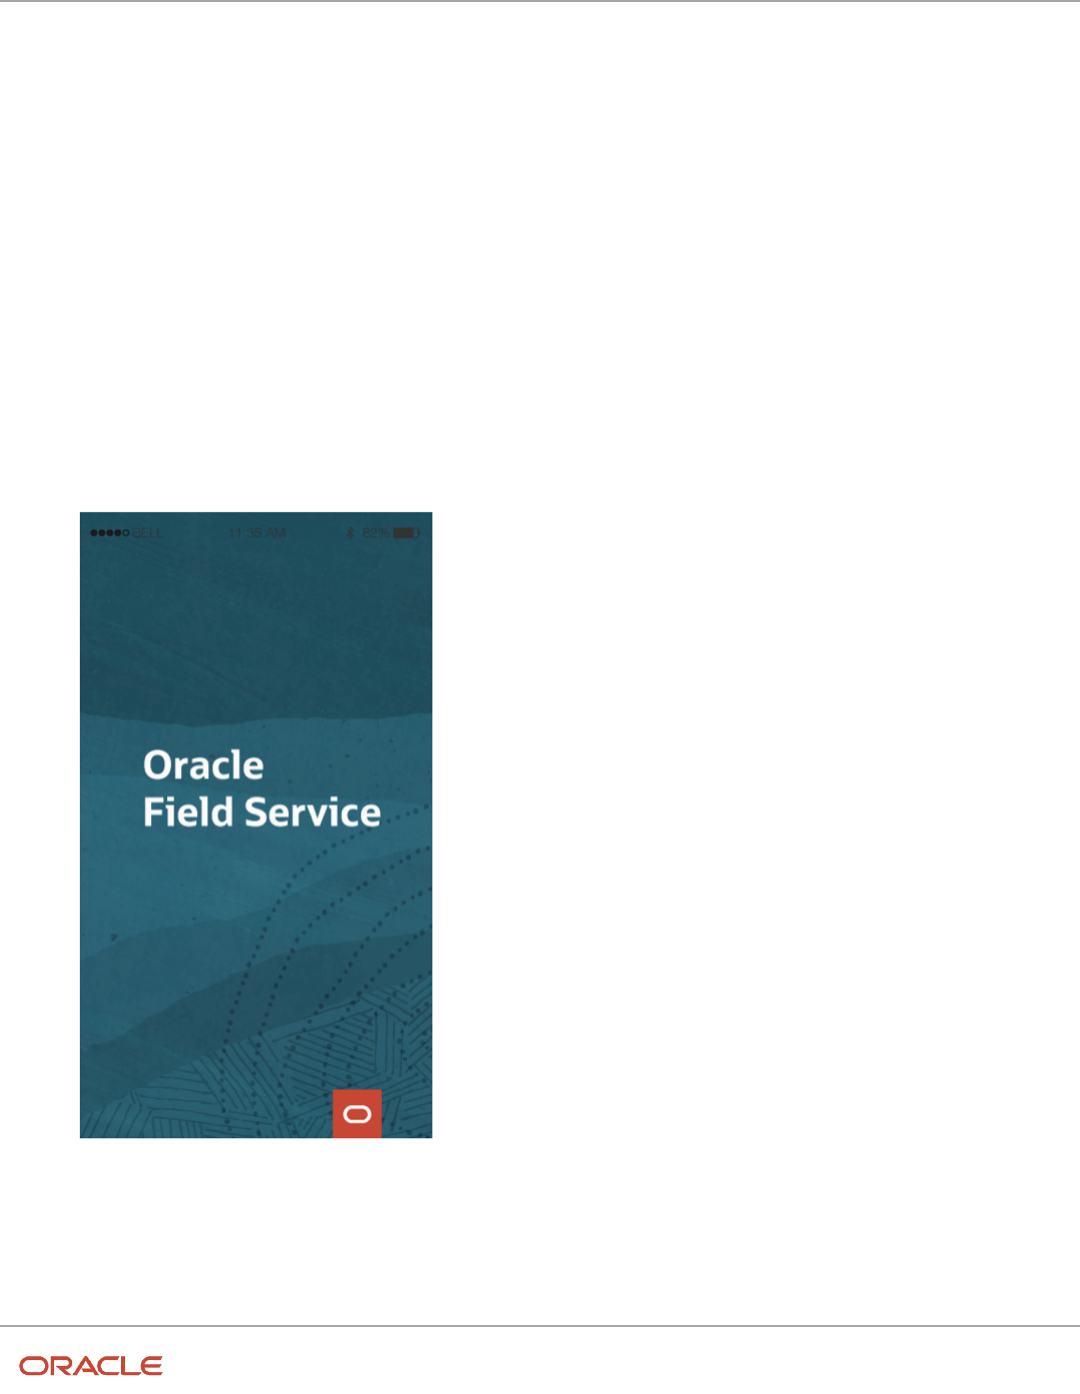
• Splash page
The Splash page now appears in Redwood theme:
2
Field Service
Using Android and iOS Mobile Applications
Chapter 1
Using Oracle Field Service Mobile Application
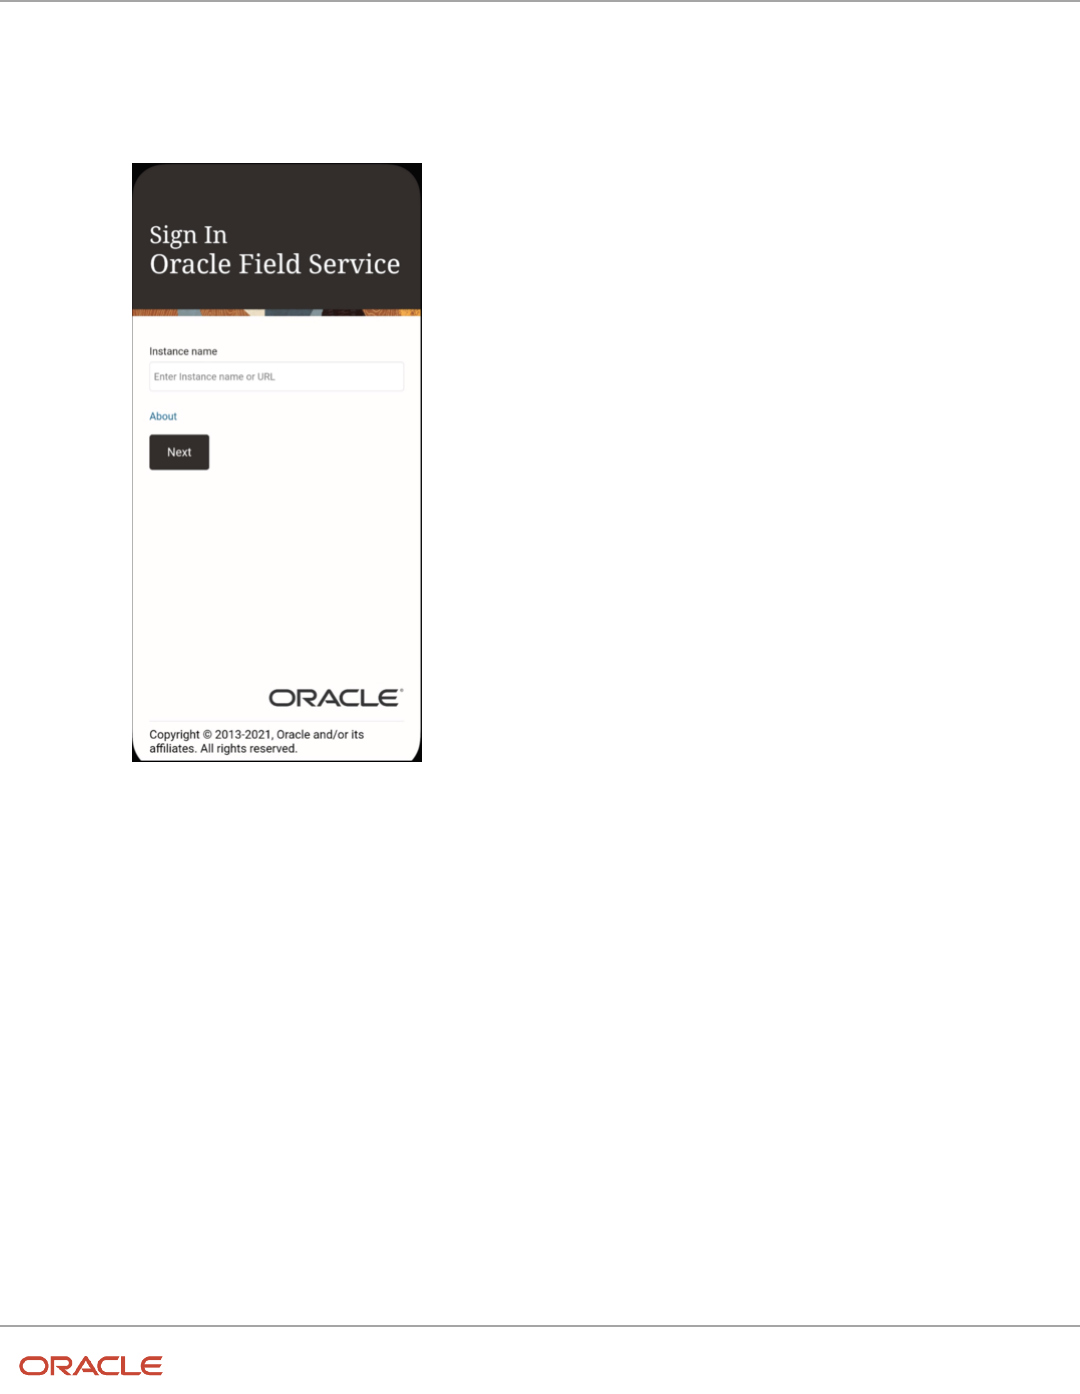
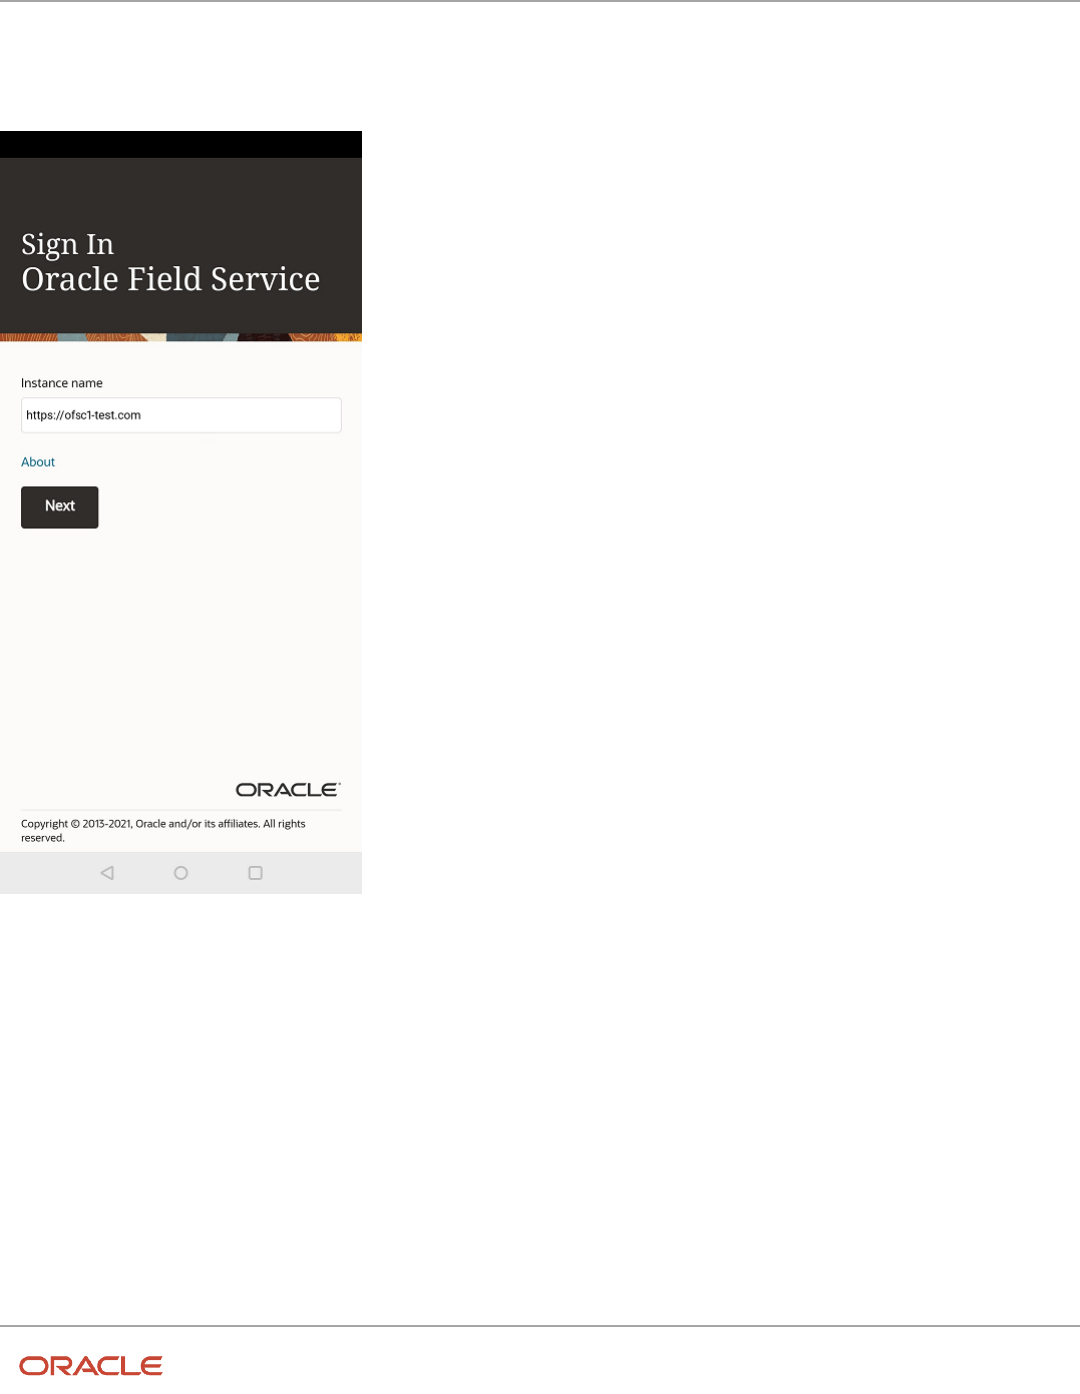
• Sign-In page
The Sign-In page in both iOS and Android Mobile apps now appear in the Redwood theme:
◦
Sign-In page for iOS:
◦
Sign-In page for Android:
3
Field Service
Using Android and iOS Mobile Applications
Chapter 1
Using Oracle Field Service Mobile Application
4
Field Service
Using Android and iOS Mobile Applications
Chapter 1
Using Oracle Field Service Mobile Application
• About page
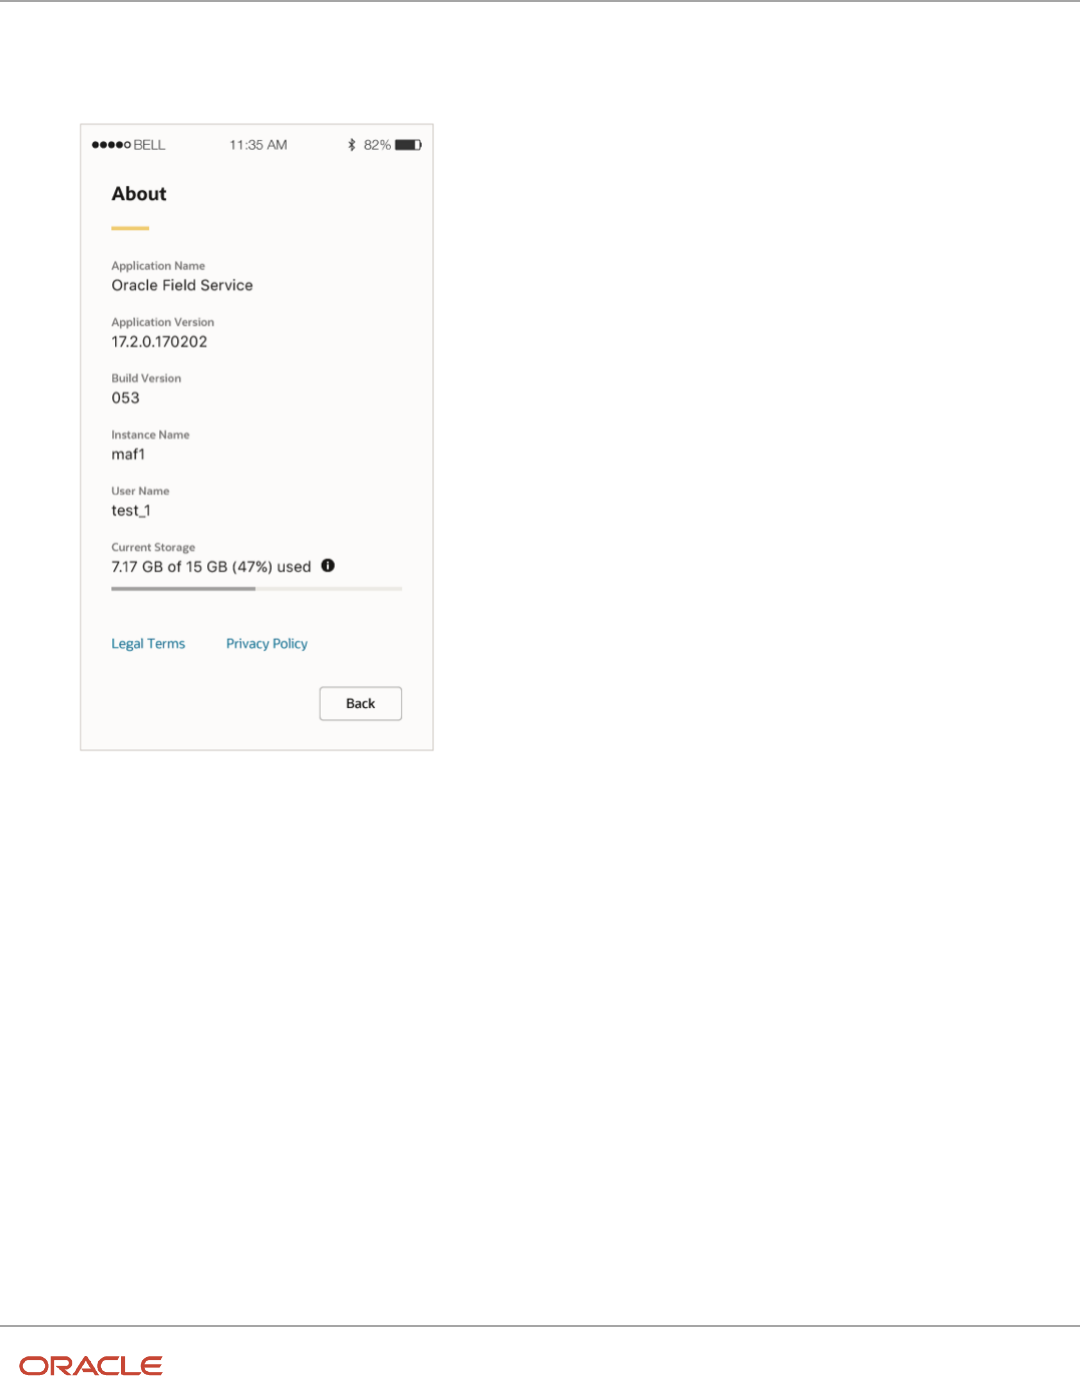
The About page now appears in the Redwood theme:
5

Field Service
Using Android and iOS Mobile Applications
Chapter 1
Using Oracle Field Service Mobile Application
• End User License Agreement page
The End User License page now appears in the Redwood theme:
Capture Images With In-App Camera
While you have previously been navigated from Oracle Field Service to the device's native camera to take pictures,
Update 22C launches a custom in-app camera module within the Oracle Field Service mobile app itself. With this in-app
camera, you can take photos without being navigated between your local device camera and the Oracle Field Service
mobile app. This provides a unified and reliable camera experience regardless of your mobile device operating system
or performance.
The Primary camera features in this release are as follows
• The in-app camera is supported only for the Oracle Field Service image property type.
• The in-app camera is only available if you have the installed Oracle Field Service mobile app (if you access
Oracle Field Service using mobile browsers, you will continue to use your native device camera).
Note: The in-app camera is only available if you upgrade to Update 22C for both the platform and the mobile app. If
you have upgraded to the latest mobile app, but the platform is on Update 22B or lower, you cannot use the in-app
camera.
6
Field Service
Using Android and iOS Mobile Applications
Chapter 1
Using Oracle Field Service Mobile Application
Follow these steps:
1. Capture Image:
a. Click a field that has an image property. The capture image page opens.
b. Click the capture image button to take pictures.
c. Click Cancel to go back.
d. Switch between the front and back cameras through the swap camera button present in the lower right
corner of the capture image page.
2. Zoom in/zoom out
Pinch in/ out in the capture image camera page to activate the zoom functionality. When zoom is activated, you
can see a zoom slider. Use the slider to manipulate zoom in addition to using the pinch in/ out action. The slider
disappears if the zoom functionality is idle for a while.
3. Tap to focus. On the capture image page, click the area where you want to focus. :
The file is uploaded.
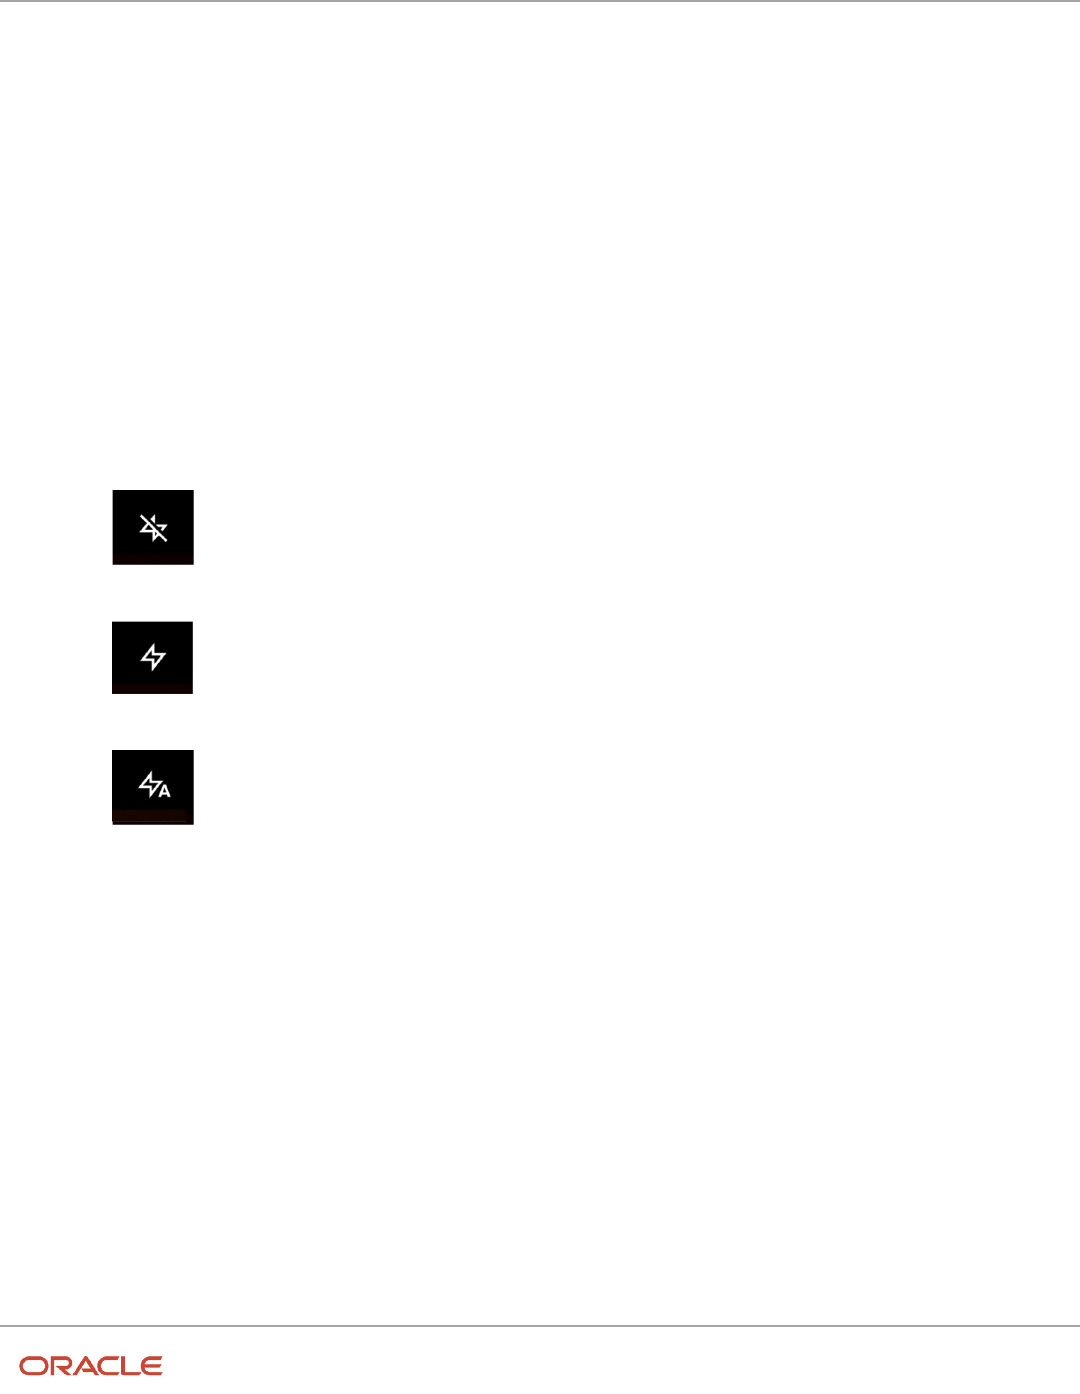
4. Use Flash settings.
◦
Flash On
◦
Flash Off
◦
Flash Auto
The icon of the current flash setting is displayed at the top right of the capture image page. Click the flash icon to
change the setting. This image shows the flash settings:
5. Preview the captured image in the Preview page. After you capture an image from the capture image page, you get
the preview page where you have options to:
◦
View captured images
◦
Edit the captured image
◦
Save the image (Submit button)
6. You can click the back icon at the top left and go back to the capture image page. If you go back without saving, you
see a warning that you will lose the captured images and any edits.
7. To crop an image, follow these steps:
a. Click the crop icon on the top left of the preview page to activate the crop mode.
b. Move the crop grid to the required area and crop the image. When you finish cropping, click the check mark
at the bottom right to confirm the edits.
c. Click the back button to exit the crop mode.
d. If you have cropped an image incorrectly, you can reset the crop by clicking the reset button at the lower
left corner of the crop page.
7

Field Service
Using Android and iOS Mobile Applications
Chapter 1
Using Oracle Field Service Mobile Application
8. To draw an image, follow these steps:
a. Click the draw icon on the top left of the preview page to activate the draw mode.
b. Draw on the image and highlight the required areas. When you finish highlighting, click the check mark and
confirm the edits.
c. Click the back button to exit the draw mode.
d. To reset a drawing click the reset button at the bottom left.
8

Field Service
Using Android and iOS Mobile Applications
Chapter 2
Install the Mobile Application
2 Install the Mobile Application
Install Oracle Field Service App for Android
You can install the Oracle Field Service app from the Google Play Store.
Before you start
Ensure that you are using an Android device with an active internet connection and you have access to Google Play
Store.
Here's what to do
1. From your Android mobile device, open Google Play Store.
2. Search for Oracle Field Service and select it.
3. Click Install.
Now, you have downloaded and installed the Oracle Field Service app on your device.
You can use the procedure described earlier, or you can download the mobile app directly from this link:
https://play.google.com/store/apps/details?id=com.oracle.ofsc
Install Oracle Field Service App for iOS
You can install Oracle Field Service Cloud app from the Apple App Store.
Before you start
Ensure that you are using an iOS device with an active internet connection and you have access to Apple App Store.
Here's what to do
1. From your iOS mobile device, open App Store.
2. Search for Oracle Field Service Cloud and select it.
3. Click Install.
Now, you have downloaded and installed the Oracle Field Service Cloud app on your iOS device.
You can use this procedure described earlier, or you can download the mobile application directly from this link:
https://itunes.apple.com/us/app/oracle-field-service-cloud/id1363168467?mt=8
9

Field Service
Using Android and iOS Mobile Applications
Chapter 2
Install the Mobile Application
10

Field Service
Using Android and iOS Mobile Applications
Chapter 3
Configure the Mobile Application
3 Configure the Mobile Application
Configure Your Instance of Oracle Field Service
Before you start
You must download and install the Oracle Field Service app from the Google Play Store (or Oracle Field Service Cloud
from the App Store).
To configure the Mobile Instance:
Here's what to do
1. Open the Oracle Field Service app (or Oracle Field Service Cloud app).
2. Read and accept End User License Agreement.
3. Specify the Oracle Field Service Mobility instance to be connected.
4. In the instance name field (for example, sunrise, or sunrise.test), enter the name of the instance you want to switch
and then select OK.
Note: You can use this approach only to configure an application installed using MDM. Do not include the
'fs.ocs.oraclecloud.com' domain in the instance name field.
5. Enter login (username) and password.
You can also create shortcuts for the Oracle Field Service instances.
Using the shortcut, you can open Oracle Field Service Mobile and load the instances automatically.
To use this option, create an XML file and download it to the device. The name of the file doesn't matter, just be sure
to include the correct instance name and URL. Here is a sample XML file:
<?xml version="1.0" ?>
<instance>
<name>Demo</name>
<url>http://demo.fs.ocs.oraclecloud.com/m</url>
</instance>
In the sample,
◦
<instance> — root node
◦
<name> — child of <instance>, contains the Name of the shortcut to be displayed.
◦
<url> — child of <instance>, contains the URL of the Mobility instance.
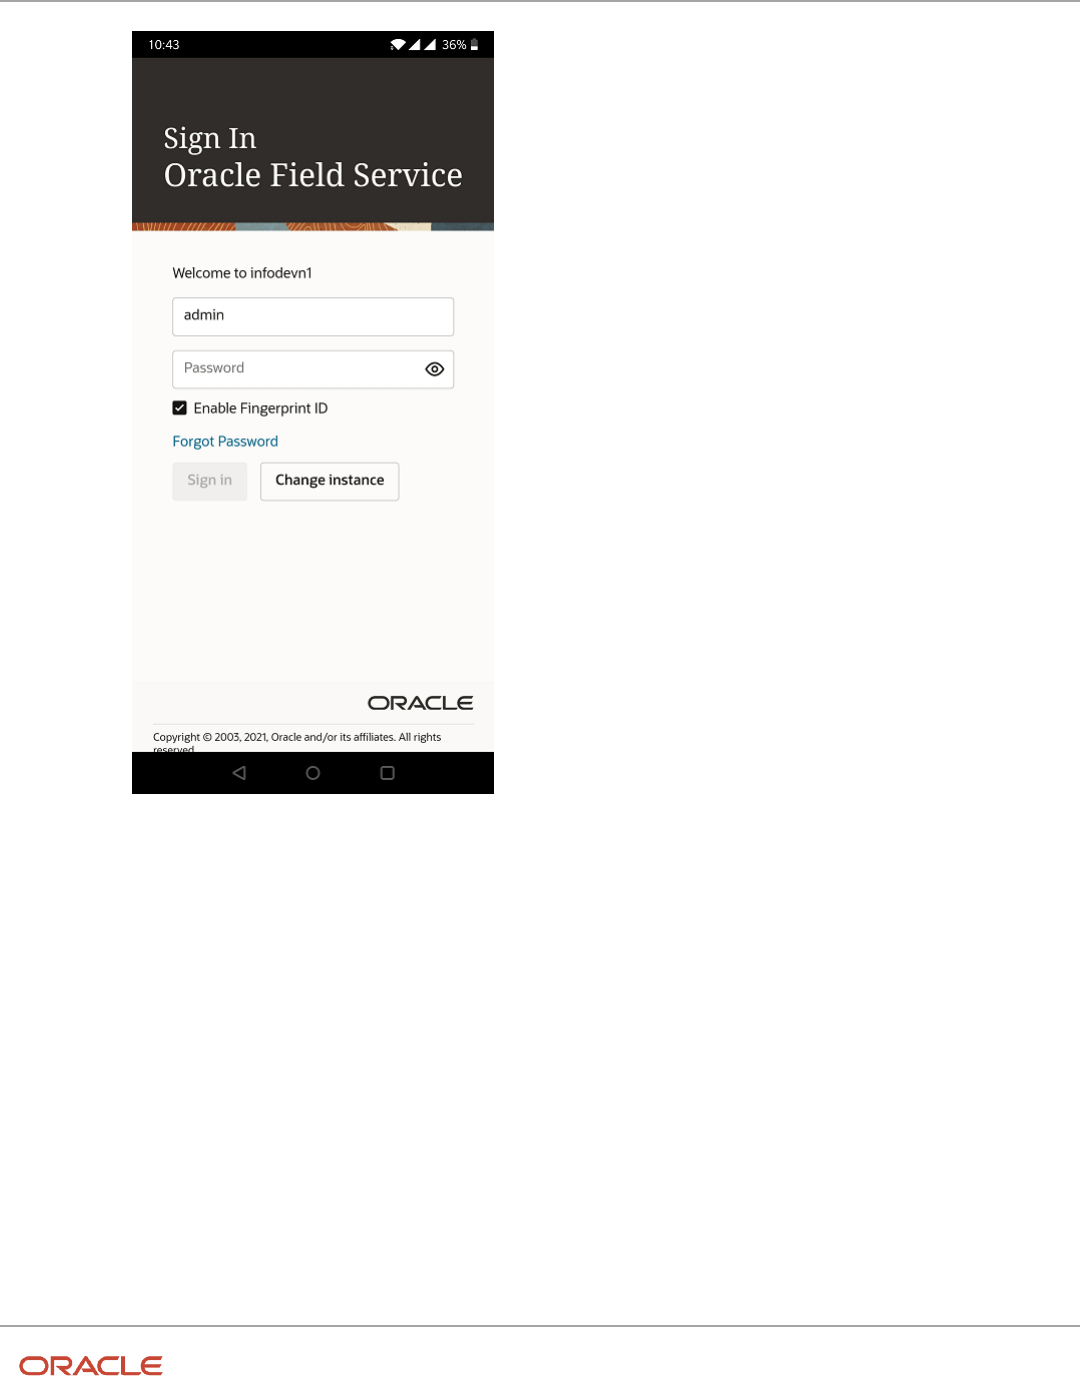
Change Instance
If you have multiple instances of the Installed Application, you can change from one instance to another from the Sign
In page.
11
Field Service
Using Android and iOS Mobile Applications
Chapter 3
Configure the Mobile Application
On the Sign In page, click Change instance and enter a different instance name in the Instance name field and click
Next. Now, you’ll be able to log in to the Installed Application using a different instance.
Upgrade the Installed Android and iOS Apps
If you log in to the Oracle Field Service app, then a prompt to upgrade the installed app to the latest major version is
displayed in the device.
The prompt is displayed if the current version of the installed Android and iOS app is at least one major version lower
than the latest available version of the app.
Click the Update button to update the app from Google Play or App Store.
12

Field Service
Using Android and iOS Mobile Applications
Chapter 3
Configure the Mobile Application
Note: If you select No Thanks or Not Now, then the prompt doesn’t display until the next major Oracle Field Service
version is released.Alternatively, you can directly visit the Google Play or App Store whenever required and upgrade
the app if the installed app version is lower than the one available on the store.
Simplified Login
Most of the times, you use the same instance to log in to the installed application.
To reduce this effort of using the same series of steps to log in to a particular instance every time, you can use the
Mobile Device Management (MDM) option.
How to configure MDM?
An MDM application must be properly configured before using it to populate your instance details. The application must
allow IT service to distribute the installed application to the end user’s devices. For more information, refer to MDM
documentation. If you need specific MDM information, contact your IT department.
Note: You can use this approach only to configure the app installed using MDM.
Each platform (Android and iOS) allows these configuration parameters:
Parameter name Purpose Type Comments
instance.url_X URL of the instance String X can be any number from 1 to 5
instance.name_X Instance friendly name String X can be any number from 1 to 5
To configure one access point, you must set the fields as follows:
instance.url_1, instance.name_1
If only one access point is passed in Managed Configuration, it is shown as plain text in the Instance name. In case of
multiple access points, a drop-down list has all the instances.
How to use MDM?
Typically, you provide the instance name and other details to access an instance. The MDM makes it easy for you by
populating the last used instance. You just have to select and access the instance. If there is more than one instance
that you use frequently, all such instances are listed under the Instance name drop-down list. You can then select the
required instance and access it.
If you have used an instance at least once, the availability of the instance is checked and if the device is online, the
offline data is updated. When the device is offline, you can continue to work by entering the PIN.
Note: If you have only one instance configured in MDM, you'll see the Login page, and not the Instance name page.
13
Field Service
Using Android and iOS Mobile Applications
Chapter 3
Configure the Mobile Application
Log In Using SSO
You can sign in with the single sign-on authentication method, if your organization has configured the SAML or OpenID
authentication types.
1. Open the Oracle Field Service (or Oracle Field Service Cloud app) app.
2. Type the Oracle Field Service instance name.
3. On the Sign In page, click Sign in with SSO.
Your credentials are redirected to your Identity Provider for authentication. If you have an active session in your
Identity Provider, you are authenticated without you having to enter the credentials. If you don't have an active
session in your Identity Provider, then you must enter your credentials.
4. If your company has created several Login Policies, type your user name. For example,
yourname@yourcompany.com.
5. Click Continue with SSO.
Your credentials are redirected to your Identity Provider for authentication. If you have an active session in your
Identity Provider, you are authenticated without you having to enter the credentials. If you don't have an active
session in your Identity Provider, then you must enter your credentials. The app preserves your last successful login
details. When you open the app again, you see the Single Sign-On page. Further, if your session is still live, then you
log in with a single click.
Instance Loading Issues
Sometimes, you might encounter issues when loading the instances related to an installed application.
When there is any problem in loading the instance of installed application, you’ll see a corresponding message on
the page where you have selected or entered the instance name. It allows you to solve the problem (to check an
entered value or check the internet connection). If there is a problem with the server connection, you can contact the
administrator.
Issue Type Message on the Screen
Network connectivity Could not connect. Please check your network.
Host not responding Connectivity issue. Please try again or contact your administrator.
Unavailable url Could not connect. Please check your configuration.
14

Field Service
Using Android and iOS Mobile Applications
Chapter 3
Configure the Mobile Application
Single Sign-On on the Mobile Application
Similar to Oracle Field Service, you can use the Single Sign On authentication method in the installed application as well.
Service Provider Initiated Login
Using the Service Provider initiated login is same as described in the ‘Configure Oracle Field Service Instance’ section.
Biometric ID Authentication
You can use the fingerprint authentication or biometric ID to log in to the installed application.
Note: To use this feature, the mobile app must be installed on devices working on Android versions (7.0 or later) or
iOS versions (10.0 or later). Also, the devices must have fingerprint scanners when Basic and / or LDAP authentication
is used. This feature is not available for SSO users using either SAML or OpenId Connect.
It may be difficult for mobile workers to enter the password on their device every time. So, using the Enable Touch
ID (for iOS) or Enable Fingerprint ID (for Android) option on the Login page makes it possible to access the installed
application without having to enter the username and password each time. The mobile application uses the built-in
operating system storage to store user credentials, which is secure.
How to configure this feature?
Follow these steps to configure this feature:
1. Click Configuration.
2. Under Displays section, select Display.
3. Under General settings, select Remember user name on Login screen or use Biometrics ID.
4. Click Save.
Log out from the current instance and log in again to use this feature.
If you do not want to use the fingerprint authentication, though the option is present in your mobile device, do not
select the Remember user name on Login screen or use Biometrics ID setting.
Disable Fingerprint Authentication
You can disable the fingerprint authentication on your device from the Login page. Just deselect the Enable Touch ID
or Enable Fingerprint ID setting. You cannot use this feature anymore unless you select the option again.
Use Biometric ID for Android Devices
You can use the biometric ID to log in to your mobile app installed on an Android device.
To use the biometric ID option for Android devices, follow these steps:
1. Double-click and launch the installed application.
2. Enter the instance name and click Next.
15
Field Service
Using Android and iOS Mobile Applications
Chapter 3
Configure the Mobile Application
3. Enter the username and password and select the Enable Fingerprint ID option.
4. Click Sign In.
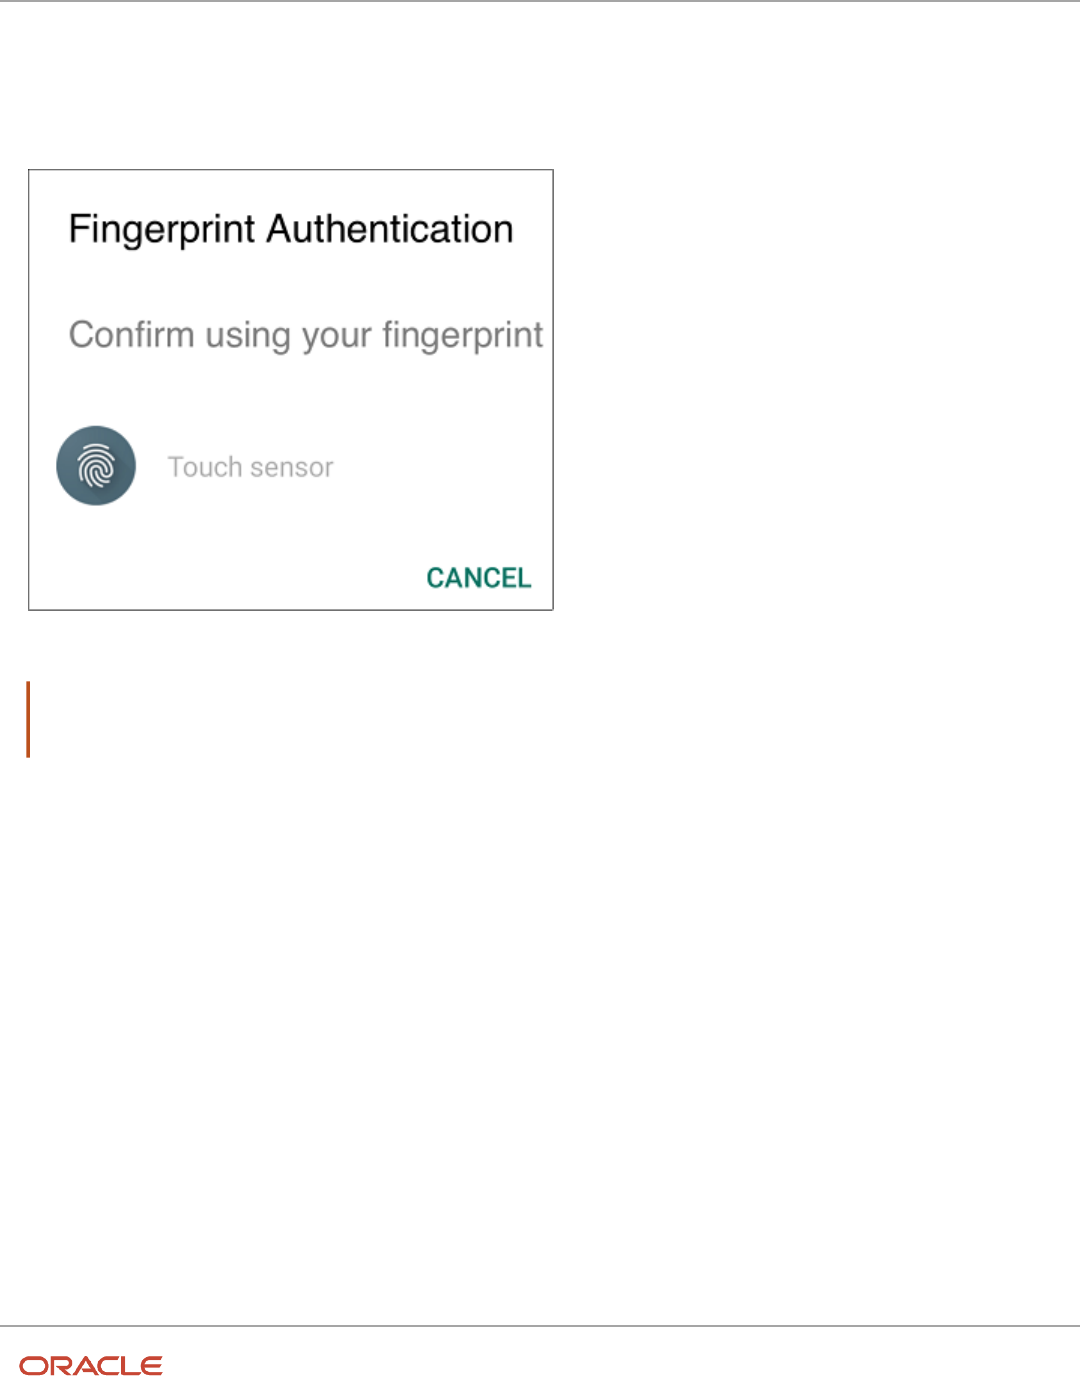
The Fingerprint Authentication dialog box to save and protect your password is displayed.
If you want to save the password to your device operating system storage, touch your finger on the device scanner.
Note: If you have saved your password using a fingerprint ID and changed or deactivated the password from
another application, an error message appears. You must map the new password with your fingerprint again on
the Login page.
Use Biometric ID for iOS Devices
You can use the biometric ID to log in to your app installed on an iOS device.
To use the biometric ID option for iOS devices, follow these steps:
1. Double-click and launch the installed mobile app.
2. Enter the instance name and click Next.
3. Enter the username and password and select the Enable Touch ID option.
16
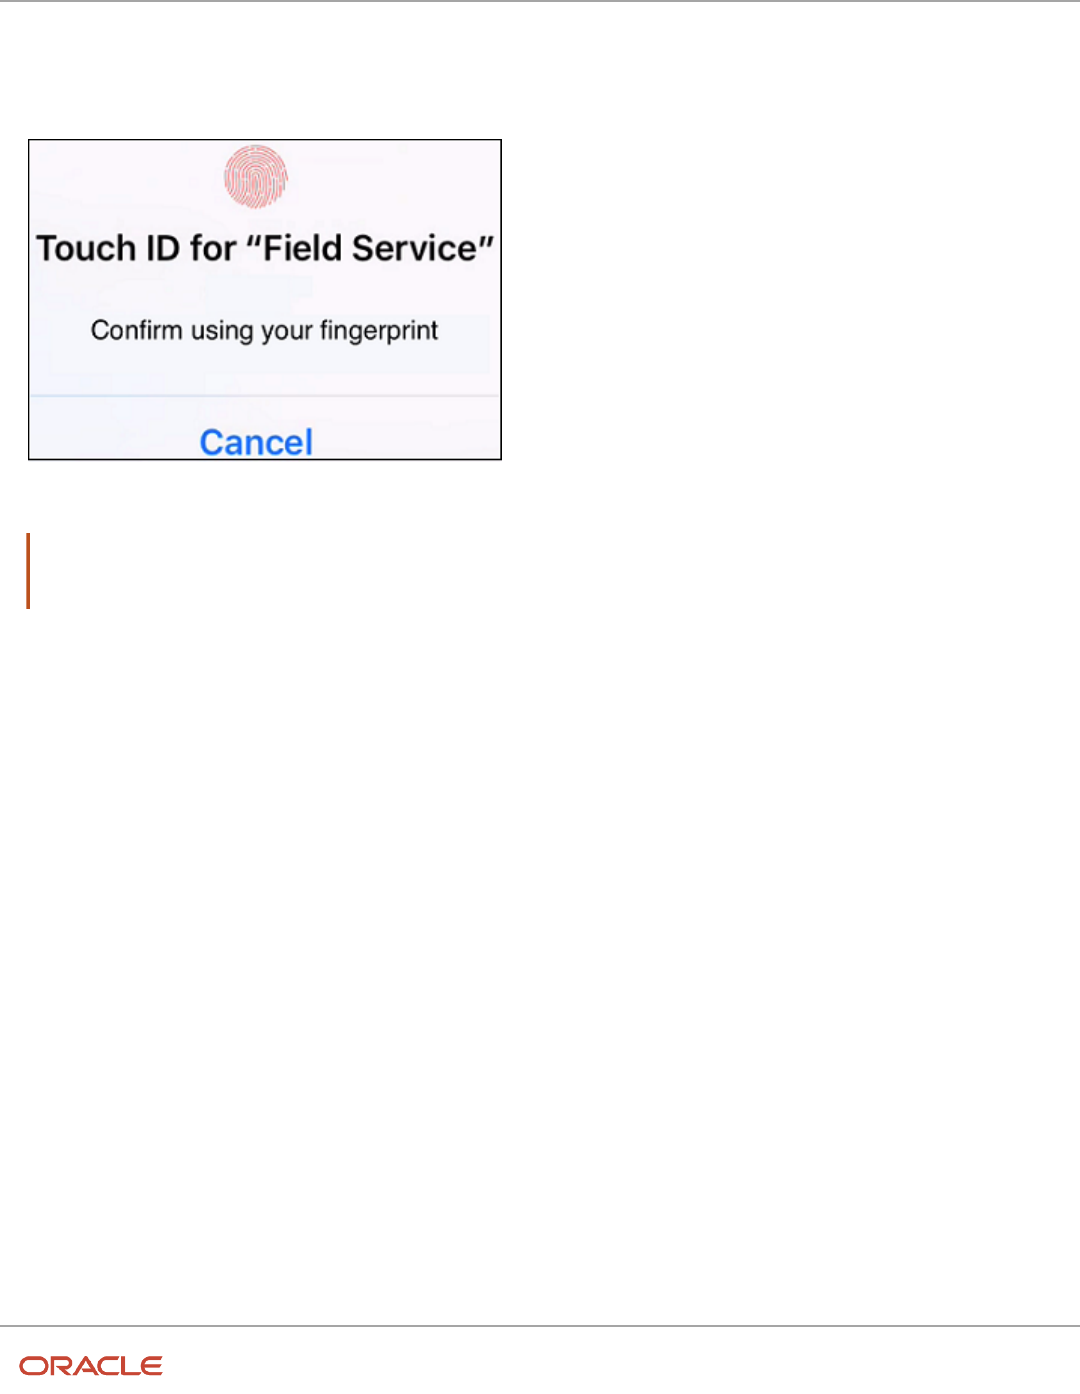
Field Service
Using Android and iOS Mobile Applications
Chapter 3
Configure the Mobile Application
4. Click Sign In.
The Fingerprint dialog box is displayed, which lets you save and protect your password.
If you want to save the password to your device operating system storage, touch your finger on the device scanner.
Note: If you have saved your password using the fingerprint ID and changed or deactivated it from another
application (such as the browser—based Mobility or another mobile device), an error message appears. You must
map the new password with your fingerprint again on the Login page.
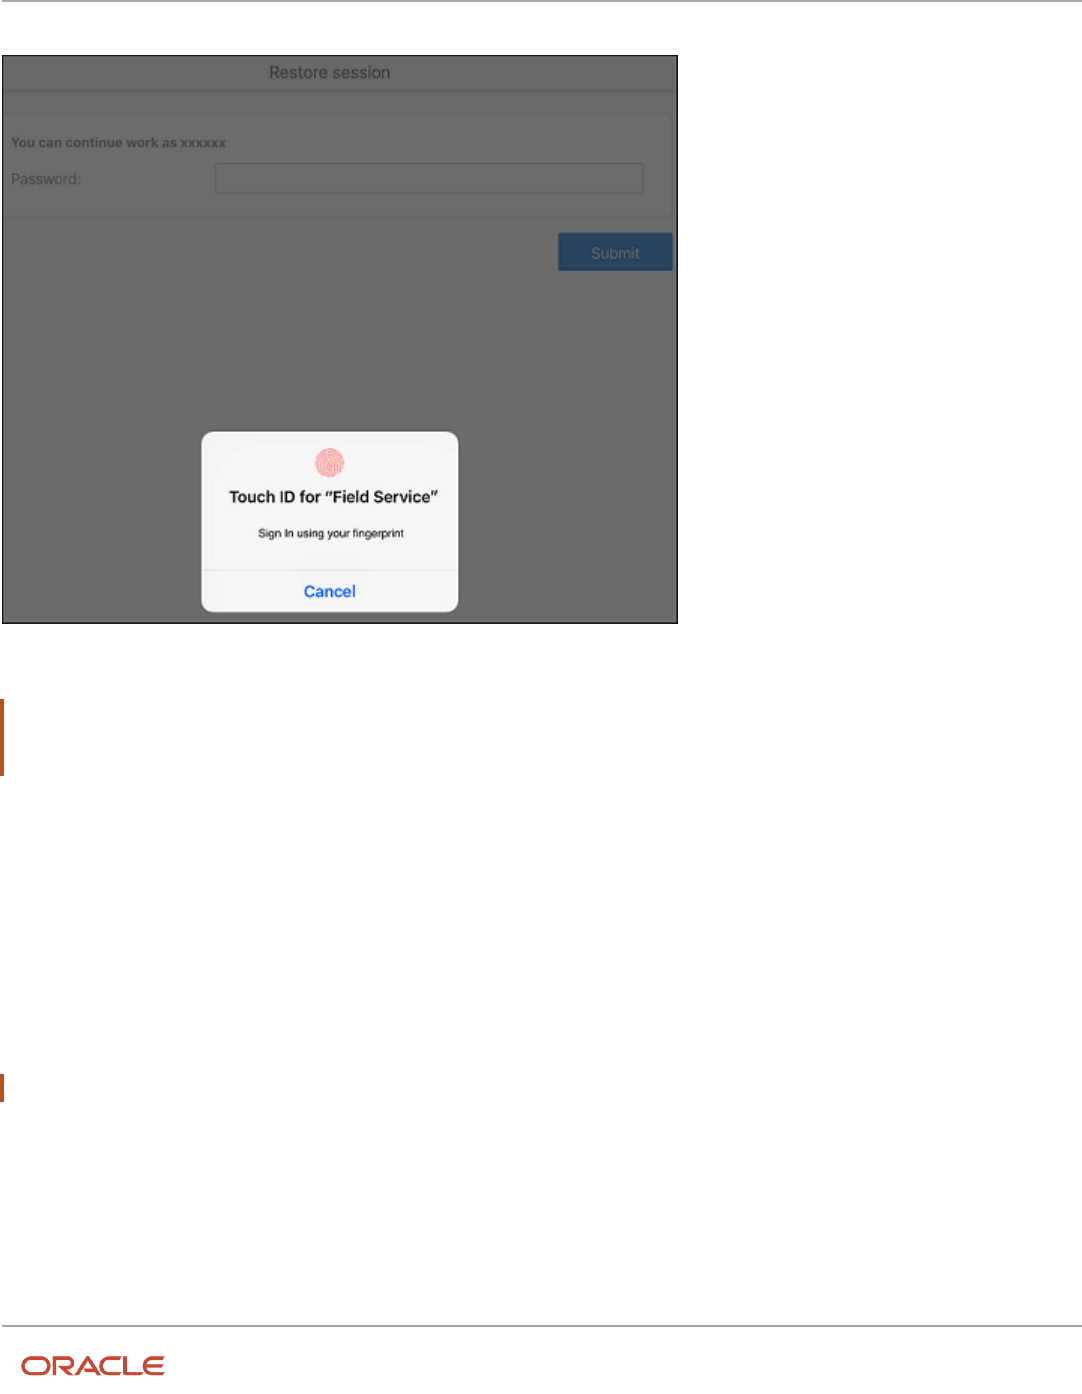
Offline Mode Re-Authentication
You can authenticate again to log into the same session if your session goes offline.
If your session is offline because of connectivity issues, or for not being active for a long time, you can re-authenticate
using the fingerprint id to log into the same session again.
You are directed to the Restore Session page, from where you can use the fingerprint ID to log into the installed
application. If you do not want to use the fingerprint id authentication, click Cancel on the fingerprint ID window on the
Restore Session page.
Android devices
17
Field Service
Using Android and iOS Mobile Applications
Chapter 3
Configure the Mobile Application
iOS devices
18
Field Service
Using Android and iOS Mobile Applications
Chapter 3
Configure the Mobile Application
Note: The fingerprint authentication appears on the Restore Session page, only if you have mapped your credentials
for fingerprint ID authentication. Otherwise, you must log in by entering your password on the Restore Session page.
This is applicable to both, Android and iOS apps.
Passcode Login for iOS Devices
If you are using the app on an iOS device, and if the fingerprint authentication fails, you can use a passcode to log in to
the app.
Sometimes you cannot log in to the installed application, because your finger print is not recognized even after multiple
attempts. In such a case, you can use the passcode to log in.
Note: This option is not available for Android devices.
19

Field Service
Using Android and iOS Mobile Applications
Chapter 3
Configure the Mobile Application
Face ID Authentication
Face ID Authentication for iOS Devices
You can use the Face ID authentication to log in to the installed app on iOS devices.
To use the Face ID authentication on your iOS device, you must have installed the application on any of these devices:
iPhone Models
• iPhone XS Max
• iPhone XS
• iPhone XR
• iPhone X
iPad Models
• iPad Pro 12.9-inch (3rd generation)
• iPad Pro 11-inch
Face ID Authentication
You can see the Enable Face ID option on the Login page.
If you select the option and confirm the permissions to use this feature, Face ID starts detecting your face.
20

Field Service
Using Android and iOS Mobile Applications
Chapter 3
Configure the Mobile Application
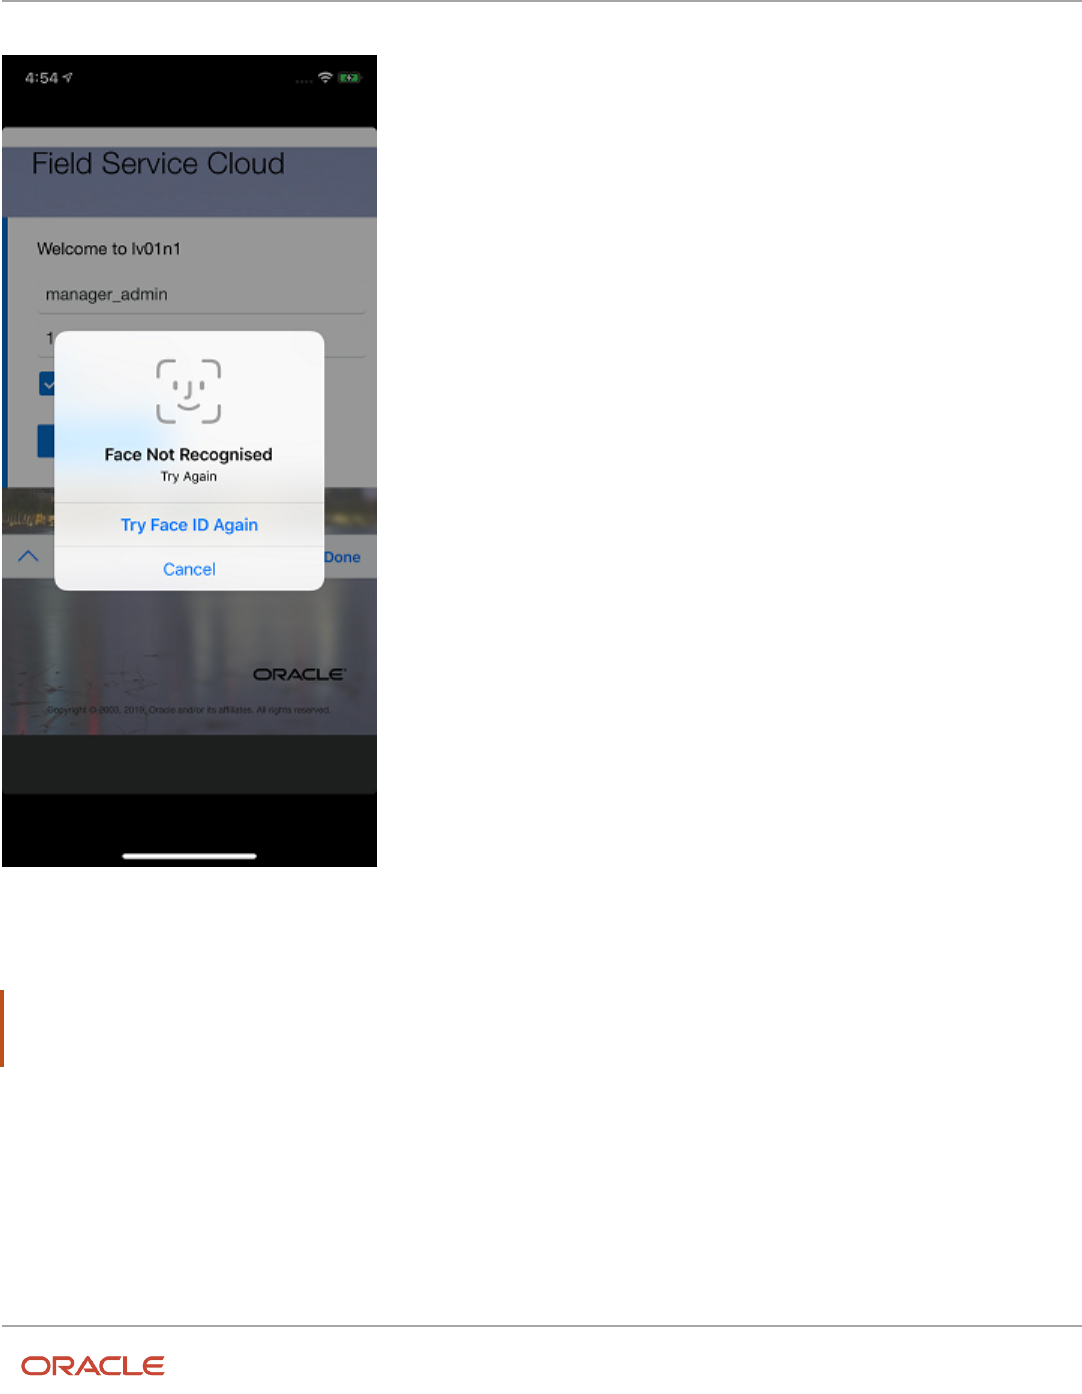
If your face recognition fails, an appropriate message displays. You may cancel the process or try again.
21
Field Service
Using Android and iOS Mobile Applications
Chapter 3
Configure the Mobile Application
After successful face recognition, you can log into the installed app. Your mobile device’s storage saves your password
and the Face ID authentication protects it.
Note: You can view the buttons and messages displayed on the Biometric ID page translated and localized to all the
supporting languages. This feature is available in both Android and iOS platforms depending on your Oracle Field
Service configuration settings.
Configure Face ID Authentication
If you want to use the Face ID Authentication to log in to the installed app, you must configure it.
To configure the Face ID, follow these steps:
22

Field Service
Using Android and iOS Mobile Applications
Chapter 3
Configure the Mobile Application
1. Click Configuration > Display.
2. Select the Remember username on Login screen or use Biometrics ID option.
3. Click Save.
Enable or Disable Face ID Authentication
You can enable or disable the Face ID Authentication from your installed app.
Enable or Disable Face ID Authentication
To enable the Face ID Authentication, follow these steps:
1. Click Configuration > Display.
2. Select the Remember username on Login screen or user Biometrics ID option.
3. Select the Enable Face ID option on the Login page.
Note: To disable the Face ID Authentication, clear the Remember username on Login screen or user Biometrics
ID option.
Canceling Face ID Authentication
You can save the password using Face ID authentication and still not use it for future logins.
You can cancel the Face ID authentication by not showing the face in front of mobile device’s camera. In such a case,
your Face ID authentication fails and you must authenticate your face again or Cancel the Face ID authentication.
Offline Re-Authentication Using Face ID
Sometimes, the installed app may require you to log in again.
You must re-authenticate to login to the installed app. This can happen regardless of whether you are online or offline.
If you have enabled the Face ID authentication, you can use it for re-authentication.
Activate or Deactivate Coordinate Gathering
Before you start
You should download the Oracle Field Service app using Google Play. The app is installed on the device and first run
passed.
To activate or deactivate Coordinate Gathering:
Here's what to do
1. Open the installed app.
The app opens the Oracle Field Service instance that you specified previously.
23

Field Service
Using Android and iOS Mobile Applications
Chapter 3
Configure the Mobile Application
2. Select Activate Route.
The app starts collecting GPS coordinates.
3. Switch to another Android app and then switch to the Oracle Field Service mobile instance.
You notice that the app continues to obtain GPS coordinates.
4. Select Deactivate Route.
The app stops collecting GPS coordinates.
Conditions for Gathering Coordinates
This section discusses the conditions followed when the mobile app collects coordinates of mobile resources.
After the route of the resource is activated, the Oracle Field Service app starts collecting coordinates, when these
conditions are true:
• Coordinates are collected only if the mobile resource is logged into the Oracle Field Service app and the route is
activated.
• Coordinates are collected continuously regardless of whether the Oracle Field Service app is started, stopped,
or the mobile device is locked.
• Coordinates are provided continuously when the internet connection is active.
• Gathering of coordinates is stopped when the mobile resource logs out from the Oracle Field Service app or
when the resource deactivates the route.
Note: If the mobile resource does not deactivate the route, gathering of coordinates is automatically
terminated within two hours after the working hours.
Mobile Application Specifics
Using Field Service Properties
When using File Property with GUI type ‘Image’, the camera opens automatically and there is no possibility to select an
existing image from the gallery. If you want to select an image from the gallery, the File Property with GUI type must be
set as ‘File’ and not as ‘Image’.
Saving Username
You cannot save passwords in the mobile app, because of security reasons. However, you can save the username in the
app.
To save the username, click Configuration > Display in the Oracle Field Service app. Then select the Remember User
Name on Login Screen option. Selecting this option saves your user name and populates it automatically, when you
use the same device and browser to log into the application. This feature is available only for users who have the Internal
and LDAP login policies, and not for users who have the SAML or OpenID Connect policies. If your authentication fails,
your user name doesn’t get populated when you try to log in to the mobile app next time.
24

Field Service
Using Android and iOS Mobile Applications
Chapter 4
Collaboration Notifications in the Mobile Application
4 Collaboration Notifications in the Mobile
Application
Collaboration Notifications in iOS App
When a new collaboration message triggers from Oracle Field Service, you’ll get an update in the notification area of the
mobile app installed on iOS.
This happens even if you’re not using the application, but the application is active in the background. You’ll find the
events related to collaboration messages, activity updates, and so on displayed in the notification area of the iOS app.
You can find the notifications in the status bar as an icon.
To receive collaboration notifications on your iOS device:
• You must have enabled the Remote Notifications option on your mobile device.
• The installed app must be run at least once on your mobile device.
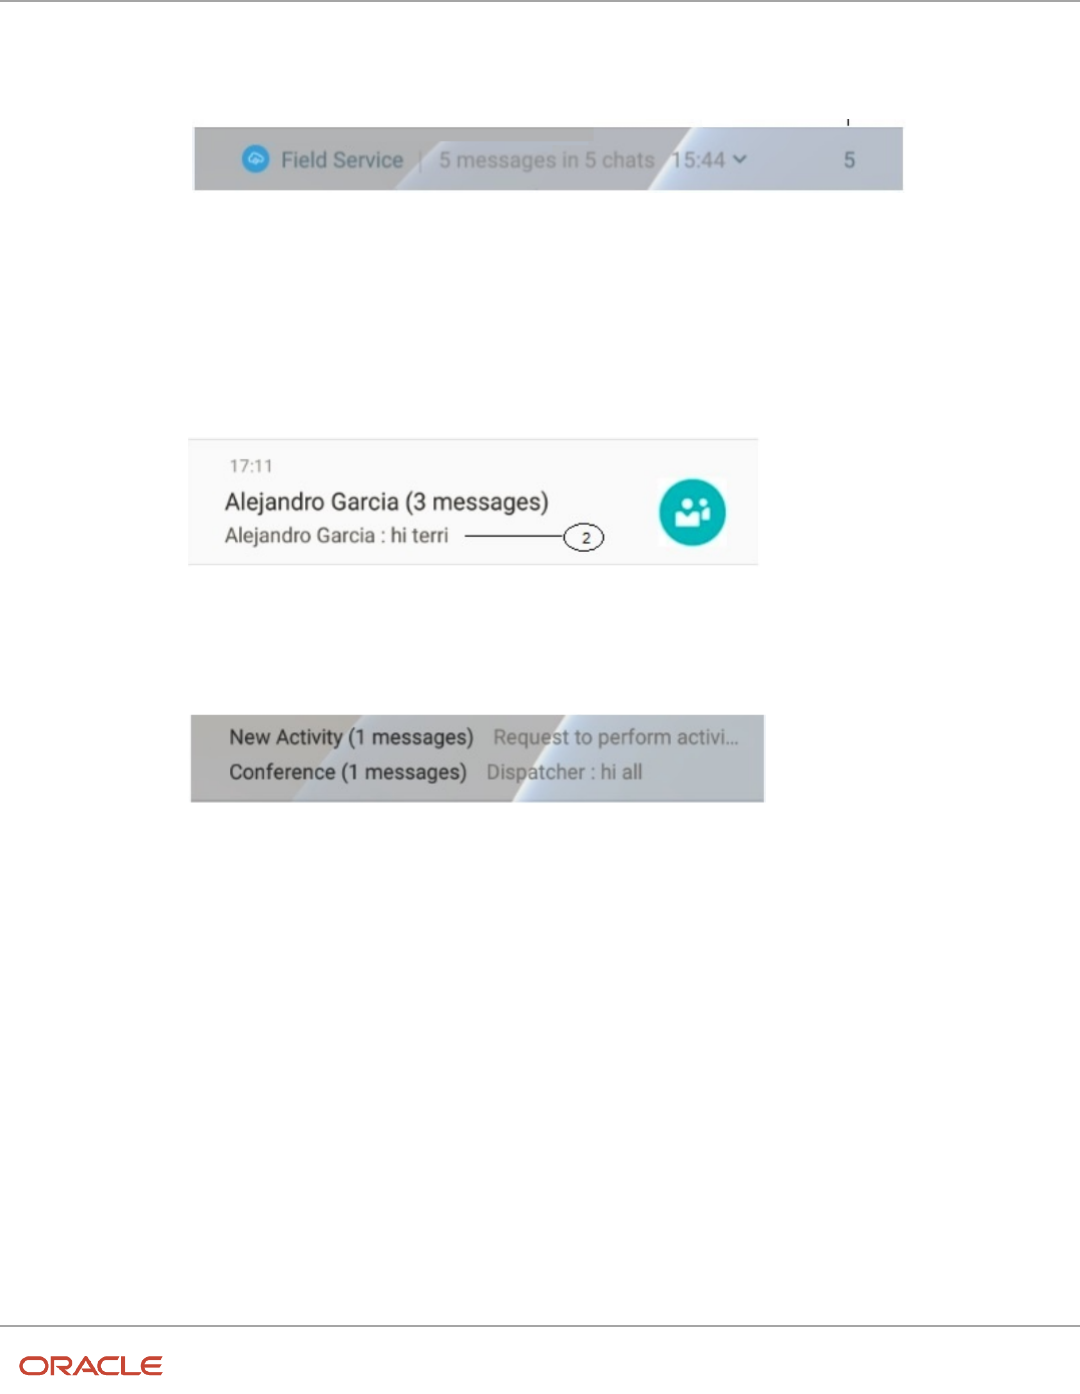
Collaboration Notification Message: Key Components
By default, all the collaboration notification messages contain some components.
• Header area — This component contains App Icon, App Name, and Timestamp.
• Content Area — This component displays Content Title and Content Text. The Content Title differentiates the
type of Collaboration messages such as:
◦
Name of the sender - in case of a one to one message
◦
Conference - in case of a conference message
◦
Broadcast - in case of a broadcast message
◦
New activity - in case of activity broadcast message
The title also contains a count of unread chats in that particular conversation.
• A Context Text — This can be the content of the text.
Collaboration Notification Types
You can receive different types of collaboration notification on your installed app.
Badge Notification
The badge present on the application launcher icon is updated with the unread collaboration chats as notifications.
These badges appear automatically when you receive a new collaboration notification and disappear when you click the
application or notification banner.
25

Field Service
Using Android and iOS Mobile Applications
Chapter 4
Collaboration Notifications in the Mobile Application
Grouped Notification
A grouped notification has multiple notifications from Collaboration bundled together on the Lock screen. You can tap a
set of notifications or expand them to see all the notifications in your list. The group summary provides the number of
unread notifications. For example, "3 more notifications."
Note: For any app that supports notifications, you can enable or disable the feature entirely. You can also enable or
disable the visibility in Notification Center, on the lock screen, app icon badging, and choose one of the notification
styles. You cannot view the notifications if you haven’t configured the mandatory settings in your mobile device.
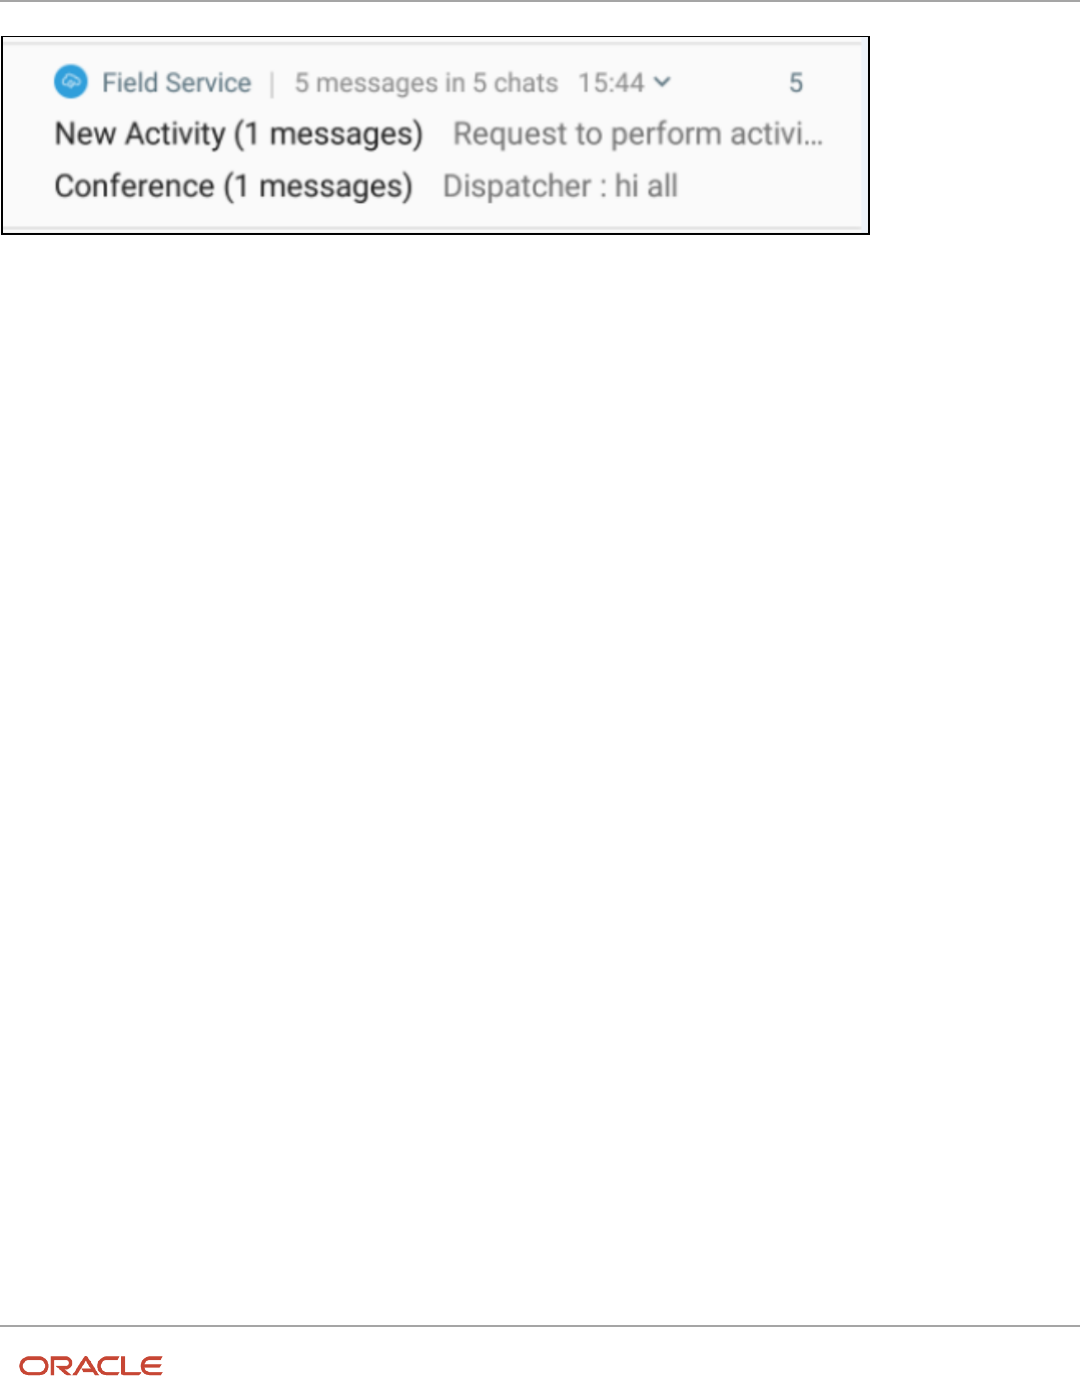
Multiple Notifications
When you receive multiple Collaboration messages of the same category, the messages are grouped and summarized
in the notification area. You can also view the information about the unread notifications. You can expand the view and
see all the remaining notifications by tapping the notifications.
About Collaboration Notifications in Android Devices
When a Collaboration event occurs, users of the installed app receive an update in the notification area of their mobile
device even when the application is running in the background.
Here are the prerequisites to enable Collaboration notifications:
• The Remote Notifications option must be enabled on the mobile device.
• The user must be logged in and the application must be running in the background.
Notification Behavior and Use
• Notifications appear in the status bar as an icon.
• Notifications are displayed on the lock screen.
• A sound or vibrating alert is present as part of the notification.
• A new notification appears on the current page.
Types and Conditions of Notifications
Collaboration notifications are available as push notifications within the Oracle Field Service Android and iOS apps. With
this feature, you can receive a notification when the application is running in the background.
26

Field Service
Using Android and iOS Mobile Applications
Chapter 4
Collaboration Notifications in the Mobile Application
Collaboration notification provides timely alerts for new Collaboration messages for native mobile app users, whether
they are using the application or not.
Note: Such collaboration notifications are displayed only when the app runs in the background.
Prerequisites:
Here are the conditions to use this feature:
• Do not disable remote notifications on the device or for the application.
• Run the application at least once on the device.
• When Oracle Field Service triggers a new Collaboration event, it sends a notification to the Oracle Field Service
app (Android OS). The notification alerts the participants of this event who are using the mobile app (Android
OS), if the application is running in the background.
Notification Features
Here is a list of notification features:
• Notifications appear on the status bar as an icon.
• Notifications appear on the lock screen.
• A sound or vibrating alert is present as part of the notifications.
• A new notification appears on the current page.
• A new notification alerts the user by blinking the device's LED.
• If a user force-quits the app using the app multitasking UI, the app does not receive remote notifications until
the user relaunches it.
• If the application is running in the foreground, the user doesn't receive notifications.
Notification Message Structure
Key components of a notification message include:
• Header Area
The header includes these items:
◦
App icon.
◦
App Name ("Field Service").
◦
Header text (It shows the total number of unread messages and the total number of unread chats at this
moment.).
◦
Time stamp with an expander icon.
◦
An indicator to represent the number of pending notification from the same application.
◦
The structure of the Header area includes:
- Header area structure when the application is unlocked:
This image shows the structure of the Header area for an unlocked application:
27
Field Service
Using Android and iOS Mobile Applications
Chapter 4
Collaboration Notifications in the Mobile Application
- Header area structure when the application is locked
This image shows the structure of the Header area for a locked application:
• Content Area
The content includes the most important part of the message - content title and text.
◦
The structure of the Header area includes:
- Content area structure when the application is unlocked:
This image shows the structure of the Content area for an unlocked application:
- Content area structure when the application is locked
This image shows the structure of the Header area for a locked application:
This image shows the structure of the Content area for an unlocked application:
◦
The structure of the notification includes:
- Content Title: Headline for the collaboration notification is defined in such a way that it should
differentiate the type of collaboration messages such as these:
◦
Name of the sender- in case of a one to one message.
◦
Conference -in case of a conference message.
◦
Broadcast -in case of a broadcast message.
◦
New activity - in case of activity broadcast message.
◦
The title also contains a count of unread chats in that conversation.
- Content Text: This can be the content of the text.
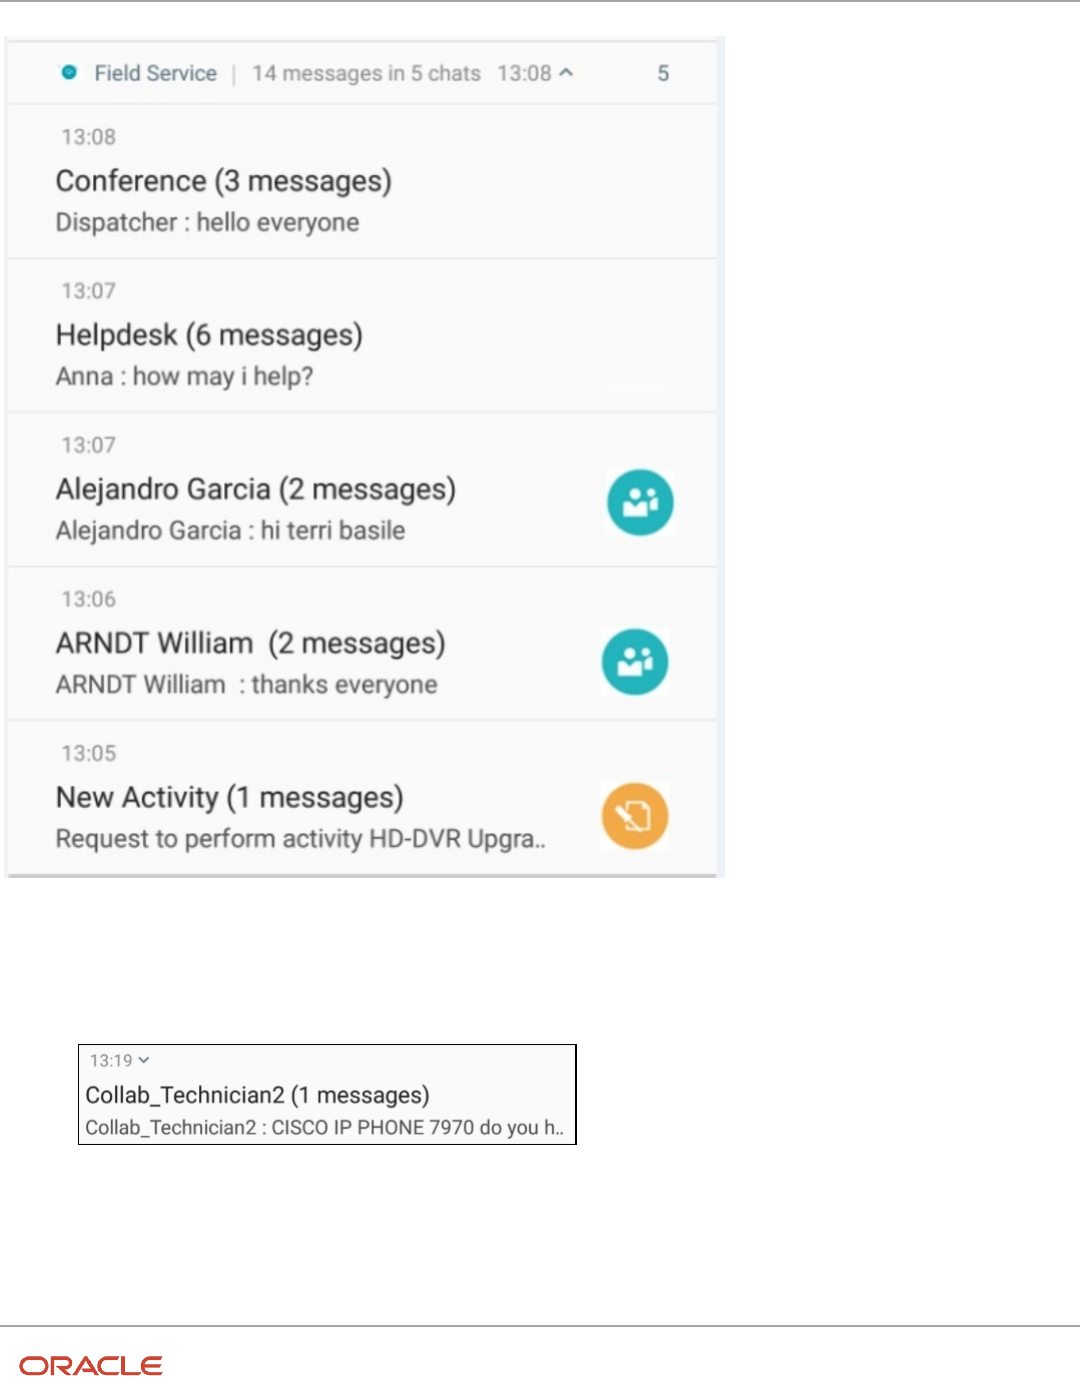
Multiple Notifications
When the app displays multiple Collaboration messages of the same type, it bundles and summarizes them as follows:
28
Field Service
Using Android and iOS Mobile Applications
Chapter 4
Collaboration Notifications in the Mobile Application
The application can display multiple notifications in a hierarchical way:
• A parent notification displays a summary of its child notifications.
• If the user expands the parent notification, it expands to display all child notifications.
• The user can expand child notifications to review its entire content.
• The app may display child notifications without the duplicate header information.
• If there is only one child notification, it appears outside the group.
Expanded view
Notification has an expand indicator in the header part of the message, and users can tap the indicator or swipe down
the notification body to expand it.
This image shows the notification message details that appear when you expand a message:
29
Field Service
Using Android and iOS Mobile Applications
Chapter 4
Collaboration Notifications in the Mobile Application
These types of messages are sent as push notifications in the Android and iOS apps.:
• One-to-One conversation between two users:
This image displays an example of a one-to-one conversation.
30
Field Service
Using Android and iOS Mobile Applications
Chapter 4
Collaboration Notifications in the Mobile Application
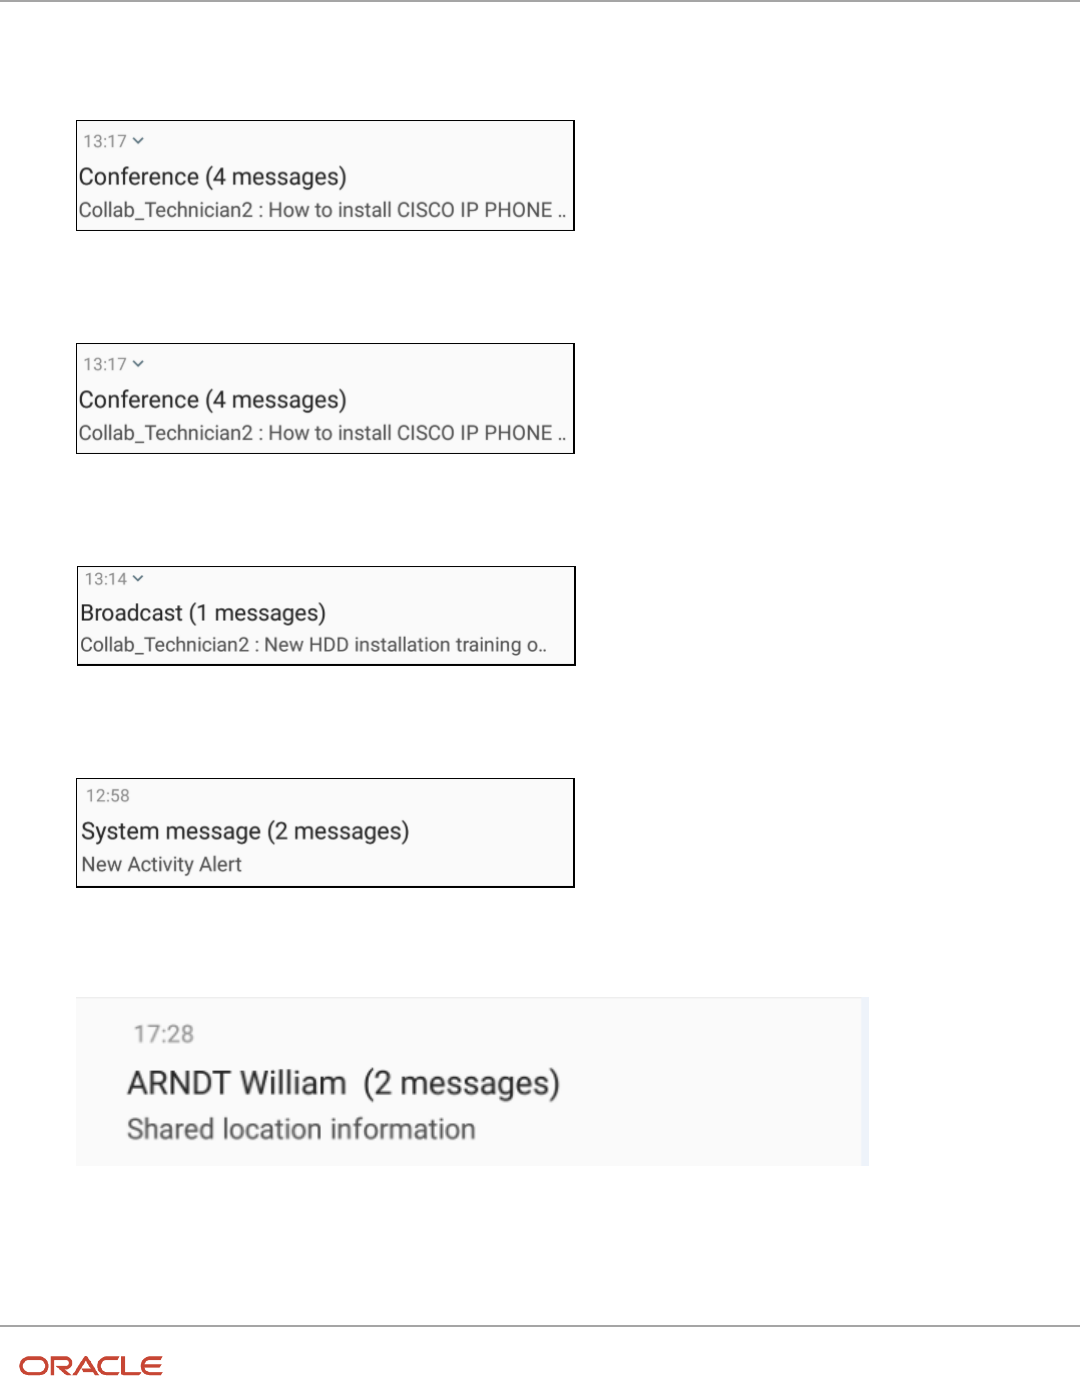
• Conference:
This image displays an example of a conference message.
• Broadcast message:
This image displays an example of a broadcast message.
• Automatic broadcasting:
This image displays an example of an automatic broadcasting message.
• Collaboration Message from Message Scenario:
This image displays an example of a Collaboration message.
• Share location between users:
This image displays an example of location sharing between users.
31

Field Service
Using Android and iOS Mobile Applications
Chapter 4
Collaboration Notifications in the Mobile Application
• Location sharing in Conference:
This image displays an example of location sharing in a conference.
• Inventory Sharing:
This image displays an example of inventory sharing.
• Helpdesk Notification:
This image displays an example of a helpdesk notification.
Notification as a badge
32

Field Service
Using Android and iOS Mobile Applications
Chapter 4
Collaboration Notifications in the Mobile Application
The badge in the application launcher icon gets updated with the unread Collaboration chats as notifications in the
application.
This image shows a notification badge:
These badges appear automatically when a new Collaboration notification appears and disappears when the user clicks
the application or notification banner.
You can do these actions to enable notifications:
◦
Follow these steps when the screen is locked:
- Double tap or single tap the notification and unlock device based on the Android version used.
- Once unlocked, the Collaboration User interface opens.
◦
Follow these steps when the screen is unlocked:
- Tap the notification.
- The Collaboration user interface opens.
33

Field Service
Using Android and iOS Mobile Applications
Chapter 4
Collaboration Notifications in the Mobile Application
34
Field Service
Using Android and iOS Mobile Applications
Chapter 5
Disabling Route Activation
5 Disabling Route Activation
Overview of the Disable Route Activation Feature
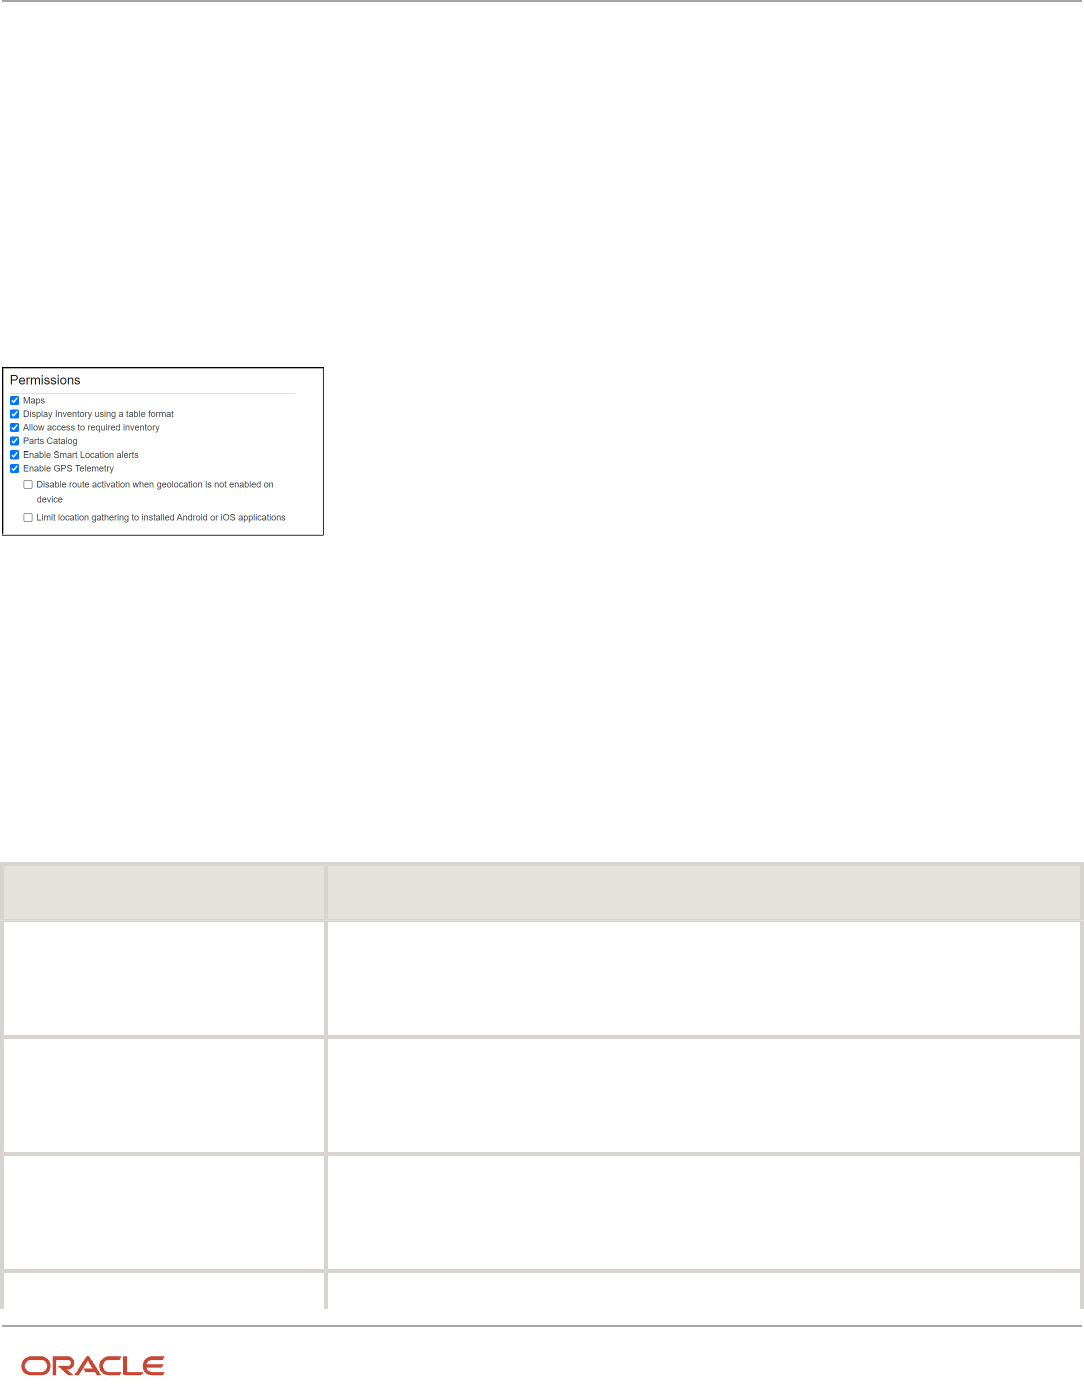
You can prevent a resource from activating their Route if they are not sharing their location (GPS) data.
You can configure this option using the Disable route activation if geolocation is not enabled on device option in the
User Type – Permissions under Enable GPS Telemetry.
Route Activation Messages
If the Route Activation feature is enabled and you have not shared your location, a warning message appears instead
of the Route Activation screen.
Accessing using the web browser
Platform Message
To activate route in iOS Route Activation requires your location.
Please enable location access in your iOS settings. To enable location services, go to Device
Settings - Privacy - Location Services.
To activate route in Android Route Activation requires your location.
Please enable location sharing on your device. Once enabled, refresh the browser page and
"allow" location access when requested.
To reactivate route in iOS Route Reactivation requires your location.
Please enable location access in your iOS settings. To enable location services, go to Device
Settings - Privacy - Location Services
To reactivate route in Android Route Reactivation requires your location.
35

Field Service
Using Android and iOS Mobile Applications
Chapter 5
Disabling Route Activation
Platform Message
Please enable location sharing on your device. Once enabled, refresh the browser page and
"allow" location access when requested.
Accessing using the Installed Applications:
For Android (installed app)
• The Enable now button appears; tapping it takes you to the Location services settings page where you can
enable the location services quickly.
For iOS (installed app)
• Extra message is added to the warning text instructing you about how to enable location services: 'To enable
Location services, please go to Device Settings - Privacy - Location Services'.
The Cancel button simply navigates you back.
Enable Location Services
If you have installed the mobile app on an Android or iOS device, you get a notification to activate the route.
For Android devices, the notification states Activate Route is disallowed while location services are disabled. Please
enable location services first.
For iOS devices, the notification states Route Activatation requires your location. Please enable location access in
your iOS settings. To enable location services, go to Device Settings, Privacy, Location Services
You must follow the instructions displayed on the page to enable the location services.
36

Field Service
Using Android and iOS Mobile Applications
Chapter 6
Using the Mobile Application
6 Using the Mobile Application
Launch the Android App Using a Direct Link
You can launch the Oracle Field Service for Android app from a browser using a direct URL.
Click a URL such as <instance_name>.fs.ocs.oraclecloud.com.
If you have installed the Android app, the app is opened. If you have an active session, you are logged into the app
directly, even if you have launched the app manually using the app icon. Closing the app or clearing it from the memory
may not end the session. If you don't have an active session, you see the Login page. As this method works on the
browser you have selected, if you provide a Login Policy label in the URL, you see the Login page that is specific to the
Login Policy.
Let's say you use a link with a different instance name from the one currently used. The new instance may be launched
only if there is no active session for the previously-used instance.
Search Inventory with Barcode Scanner
You can use the Barcode Scanner button to search for inventory in the mobile app.
Note: The Barcode Scanner button is available on the inventory search page when you use the mobile app (for
both iOS and Android devices). The button is not available when you use the browser-based Oracle Field Service
application unless a plug-in is developed and configured.
In general, parts and equipment have barcodes printed on their package. The Barcode Scanner button added to the
Search field helps you find a part or equipment without the need to type any text and tap the Search button. This
feature allows the Barcode Scanner to scan the barcode and Oracle Field Service to run the search without the need to
tap the button and populate the result.
These screenshots show the Inventory search page with the Search field and the Barcode Scanner option on small and
large screen devices respectively:
37

Field Service
Using Android and iOS Mobile Applications
Chapter 6
Using the Mobile Application
To use the Barcode Scanner:
1. Click Search in the header of the page. The Search field with the barcode scanner appears. On a large screen
device, click Search in the header. A drop-down list appears with the barcode scanner button in it.
2. Click the Barcode scanner button and place the device in front of the printed barcode on a package. The
barcode information is captured and the search is run.
All the relative inventory items appear on the page. You can select the required part or equipment and continue with
your activity.
Barcode Type Android iOS
QR_CODE + +
DATA MATRIX + +
UPC_A + +
UPC_E + +
EAN_8 + +
38
Field Service
Using Android and iOS Mobile Applications
Chapter 6
Using the Mobile Application
Barcode Type Android iOS
EAN 13 + +
CODE_39 + +
CODE_93 +
CODE_128 + +
CODABAR +
ITF + +
RSS14 +
PDF417 +
RSS_EXPANDED
Browse Local Files Support in Native Application
As a user of the installed iOS or Android app, you can select the file location and upload files to Oracle Field Service
from the photo library or a third-party storage device using the file property (that is, when the GUI type is file element).
The file location depends on the OS version and the installed third-party software.
1. Log in to the installed iOS or Android app.
2. Click Upload.
Note: The Upload button is displayed if there is a file property configured on the form. The File property is always
shown as a button on a form and is configured in the Configuration > Properties page.
3. Select a file from a photo library or browse for local files (may include third-party storage based on the installed
software).
The file is uploaded.
4. Locate a file and click the link on the page or form to download the uploaded files.
The Android app saves the file to the Download folder and notifies the user. The message "Starting download” is
displayed for Android users. If an error occurs while downloading, the "Unable to download” message is displayed.
iOS devices allow you to save or re-send the file. The list of suggested applications and actions is controlled by the
OS and depends on the file type.
Note: The iOS app does not prevent users from using system features such as 3D Touch and allows users to edit
image thumbnails for the image type. However, there is no similar option in Android OS.
39

Field Service
Using Android and iOS Mobile Applications
Chapter 6
Using the Mobile Application
Download Files From iOS Devices
The installed iOS apps support downloading export files of all native screens and files within hosted plug-ins. You can
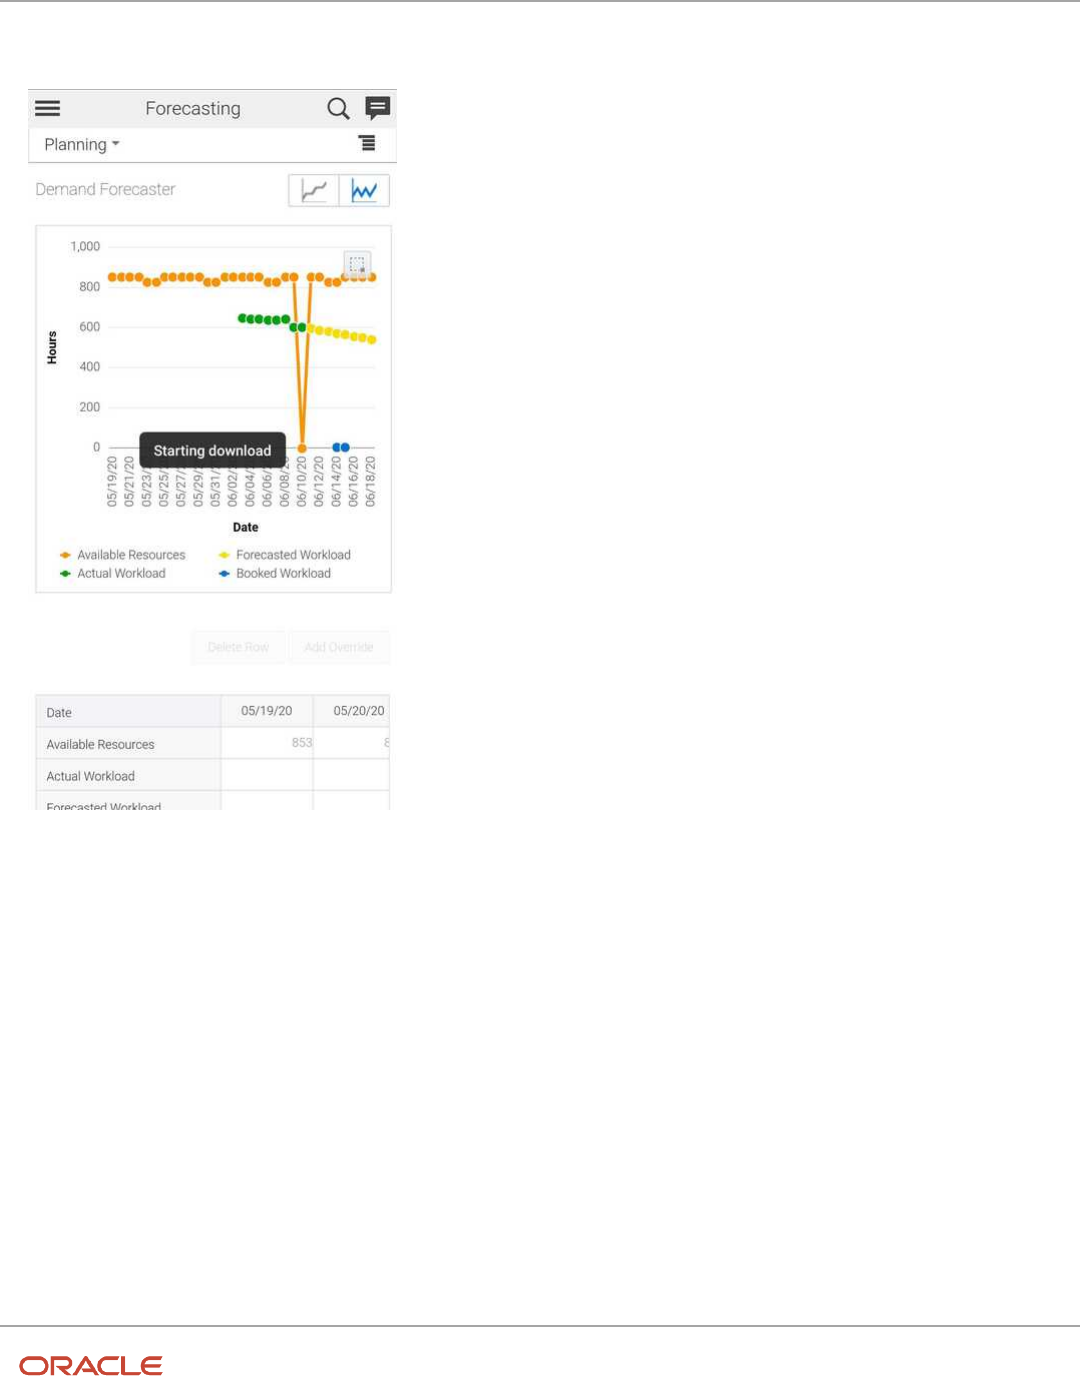
export the files from within Configuration, Reports, and Forecasting pages.
Note: To download files from plug-ins, set the Target field to 'self'. If you leave the Target field blank, target is set to
'self'.
1. Click Export or Download.
◦
After the download is completed, the iOS device displays the message, “Download finished”. This image
shows the Download Finished message.
40
Field Service
Using Android and iOS Mobile Applications
Chapter 6
Using the Mobile Application
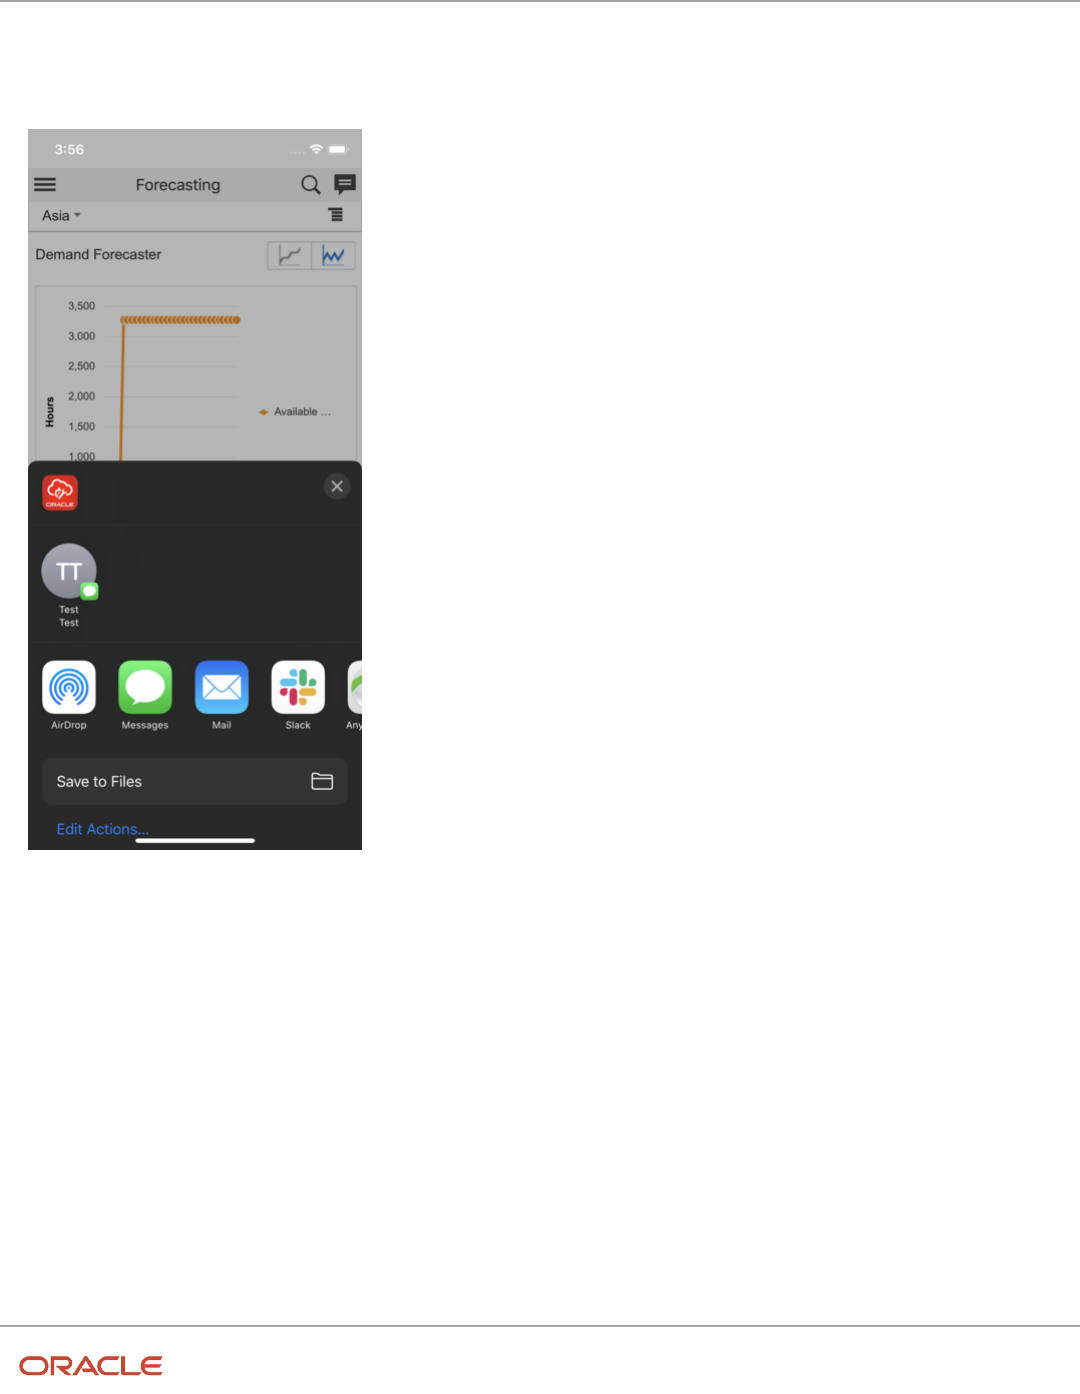
2. The iOS device prompts you to either confirm saving the file or choose from other available options. This may
be based on the native iOS functionality.
This image shows Save to Files and Edit Action options to save the file:
41
Field Service
Using Android and iOS Mobile Applications
Chapter 6
Using the Mobile Application
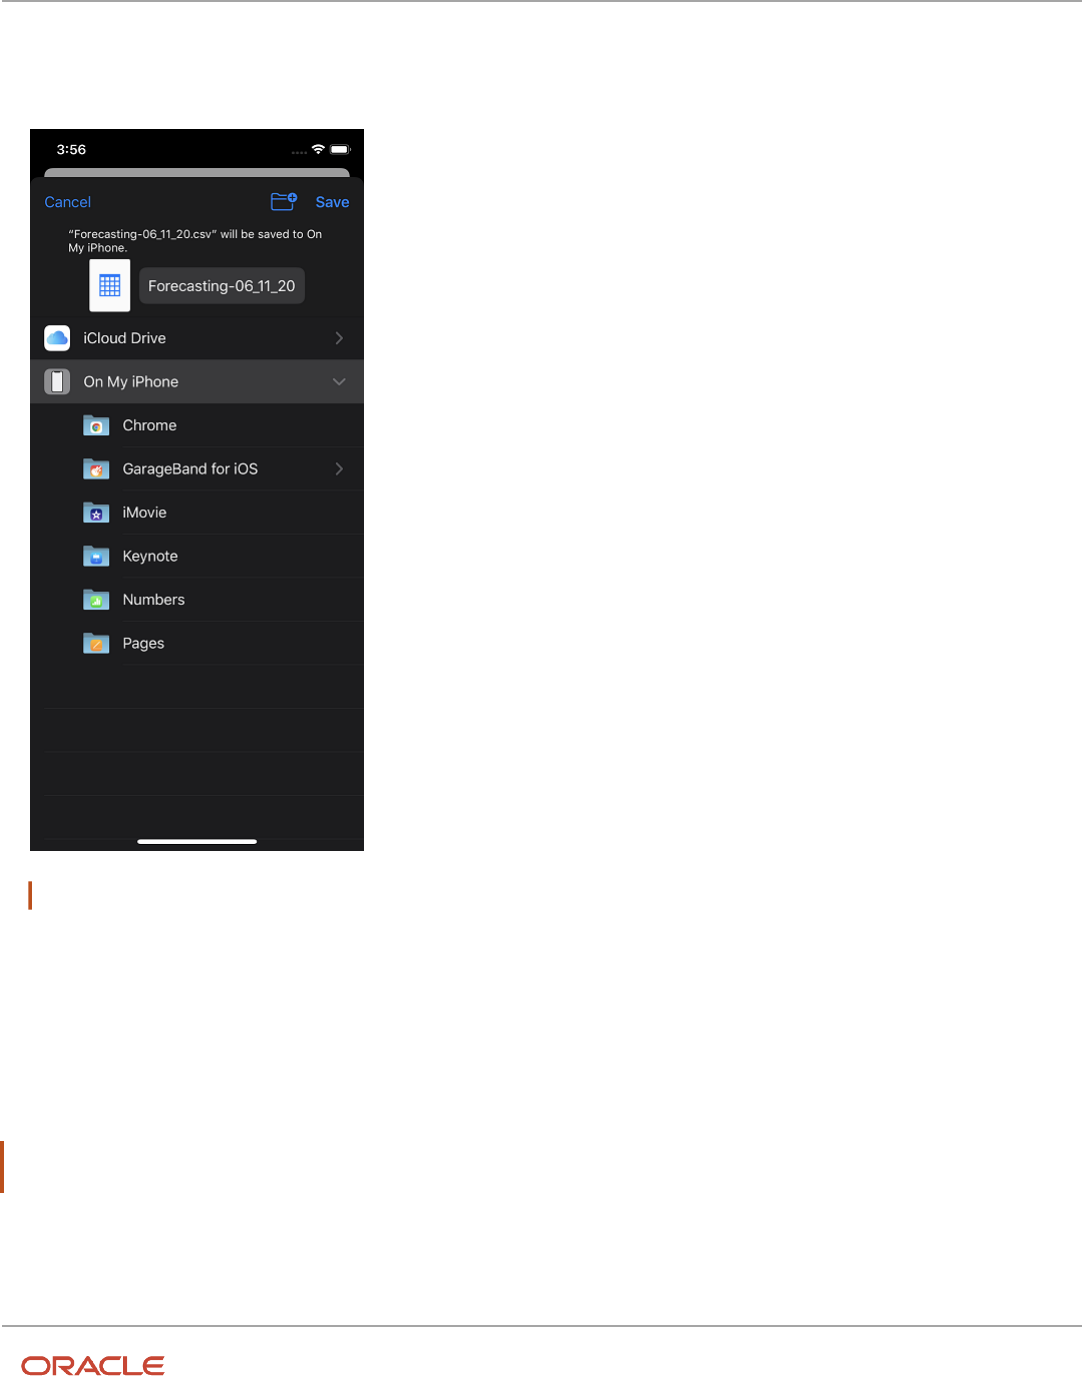
3. Click Save to Files and then select the location where you want to save the file.
The specified location to save files may vary per the native functionality of the iOS device.
This image shows the location options to save the file:
Note: You can open JSON files from within plug-ins in the iOS app.
Download Files From Android Devices
The installed Android app supports downloading export files of all native screens and files within a hosted plug-in. You
can export such files from within Configuration, Reports, and Forecasting pages.
Note: To download files from a plug-in, set the Target field to 'self'. If you leave the Target field blank, target is set to
'self'.
1. Click Export or Download.
42
Field Service
Using Android and iOS Mobile Applications
Chapter 6
Using the Mobile Application
2. Once the Android device initiates an export or a file download, the Starting Download message appears.
This image shows the Starting Download message:
3. Review the status of the download in the notification center.
Results:
You can access the downloaded file per the native functionality of your device.
The Notification Center shows the download status.
Print Files From the Mobile App
You can print files from within the installed app. All the pages within the app that supports printing such as, Reports
within Dashboards and the Print Route functionality are supported.
Print Within Custom Plugins
You can use the openLink procedure of Plugin API to print files from custom plug-ins. This procedure opens the link in
the default system browser from where users can use the browser's print functionality to print the document.
Using the installed app you can print files through the standard Print dialog box.
43
Field Service
Using Android and iOS Mobile Applications
Chapter 6
Using the Mobile Application
Print Functionality
You can access the device's native print functionality and print the file.
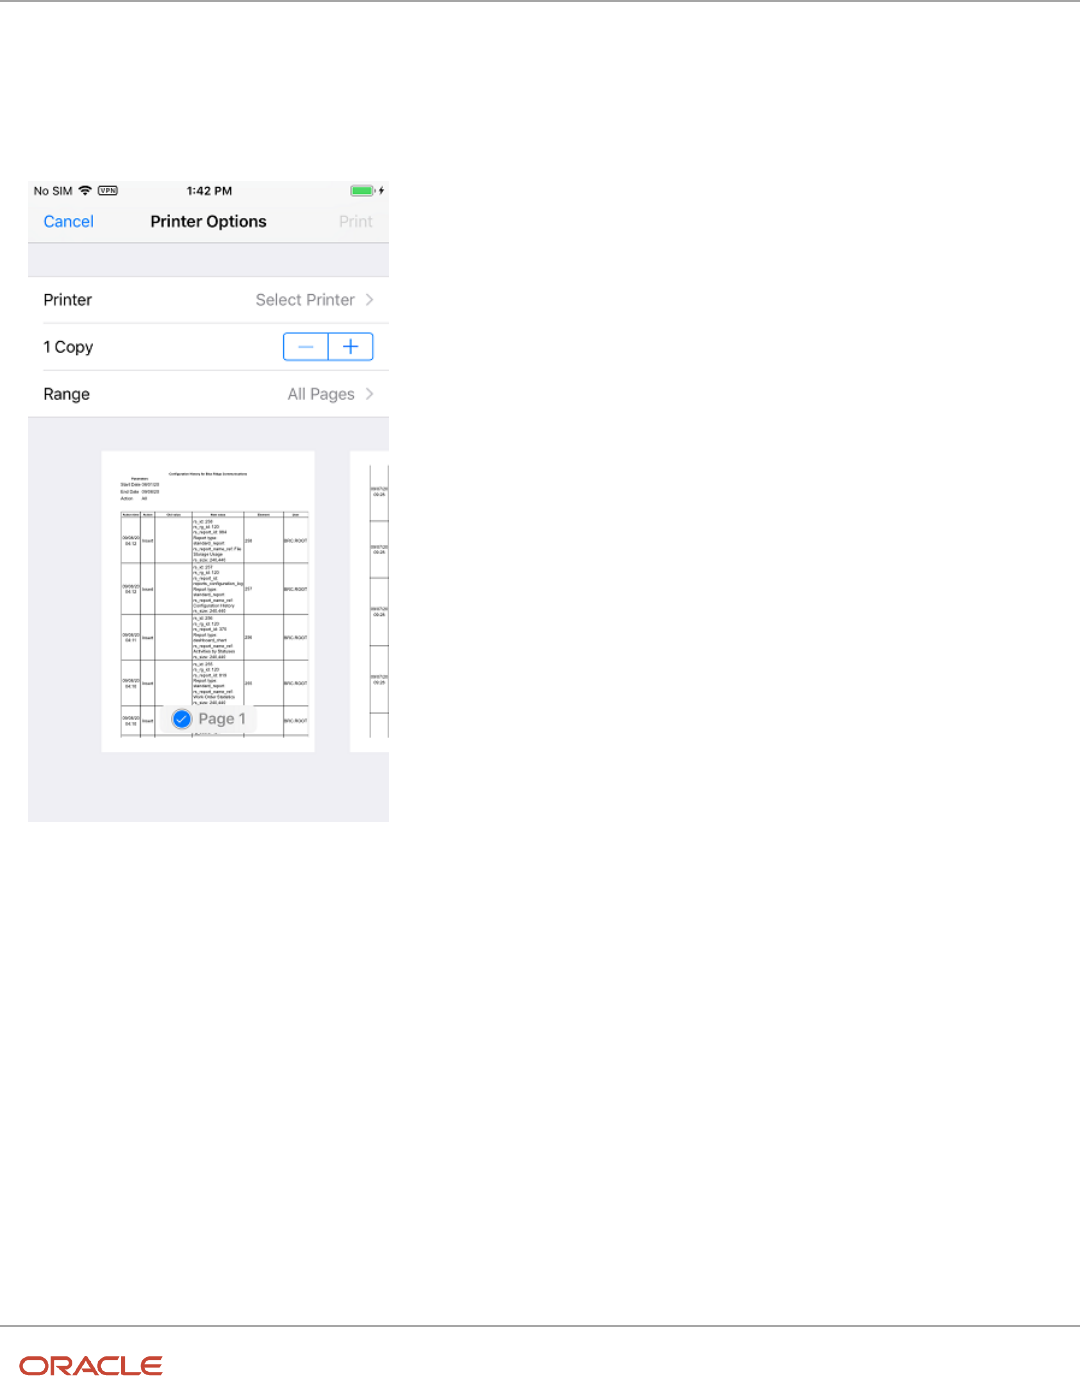
1. Tap Print. A preview of the printed information appears.
This screenshot shows the Printer Options in the native print dialog box.
2. Review the information and complete the printing.
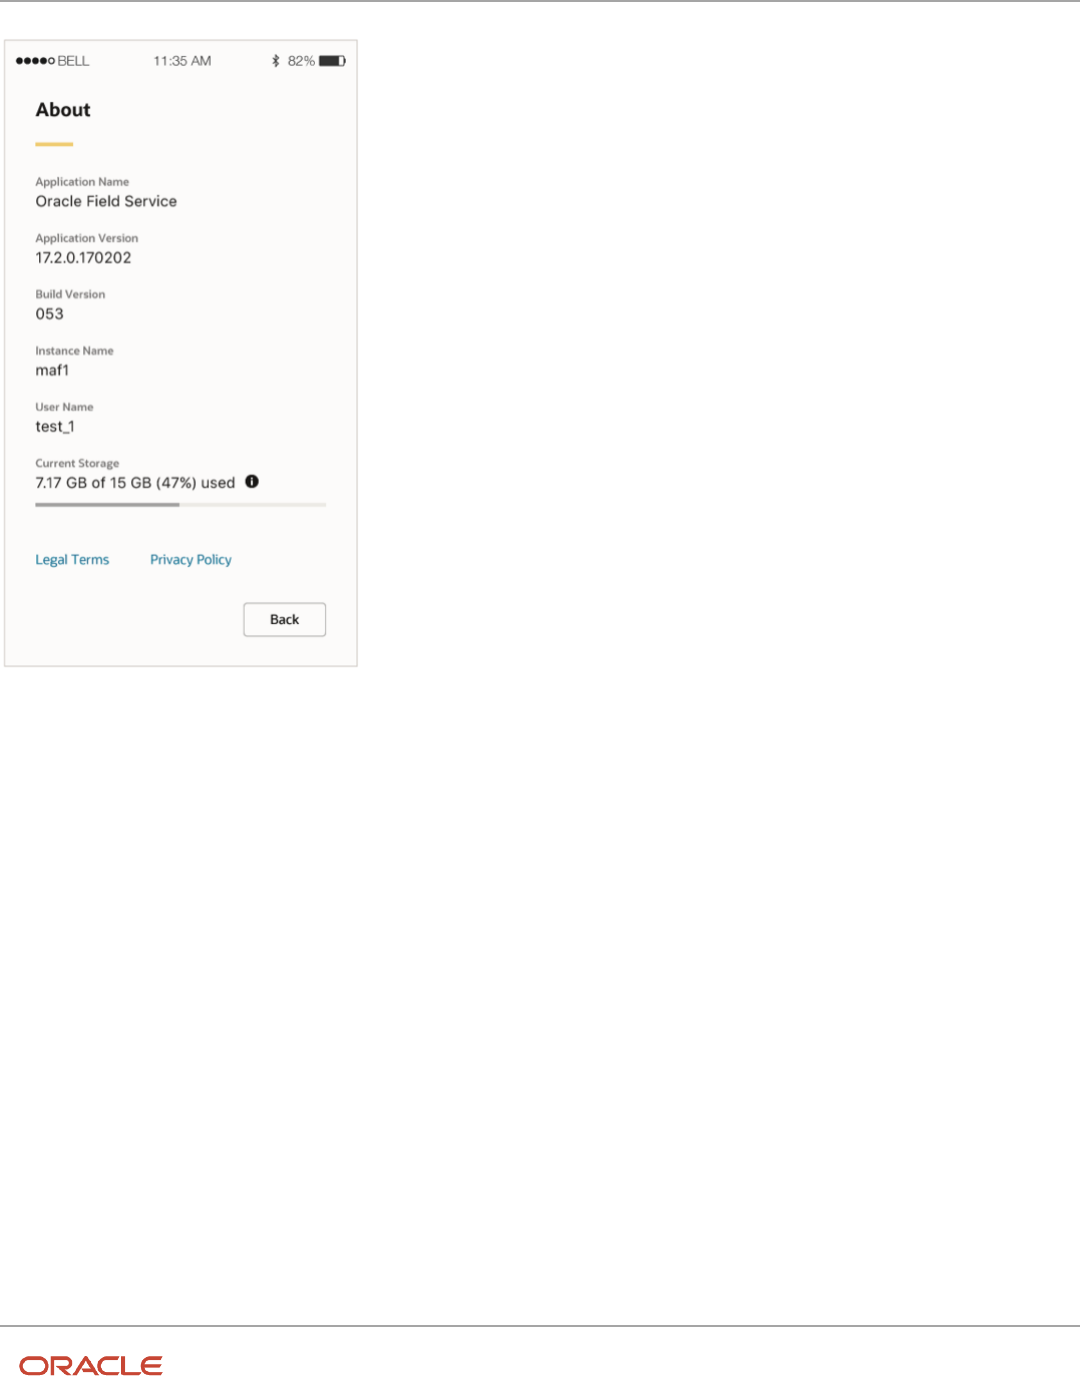
Available Storage Notification When Low
You can view the available internal storage on the About page of your installed app. If the storage goes below 100 MB,
you can see a notification in the app notification area.
The total available and used storage of the device is displayed on the About page of the installed app.
The colored part of the bar indicates the amount of space that is consumed. The consumed data includes the data
consumed by all the apps and the data within the device and not just the data consumed by Oracle Field Service.
This screenshot shows the About page:
44
Field Service
Using Android and iOS Mobile Applications
Chapter 6
Using the Mobile Application
If the used data goes above 90%, the bar is displayed in red.
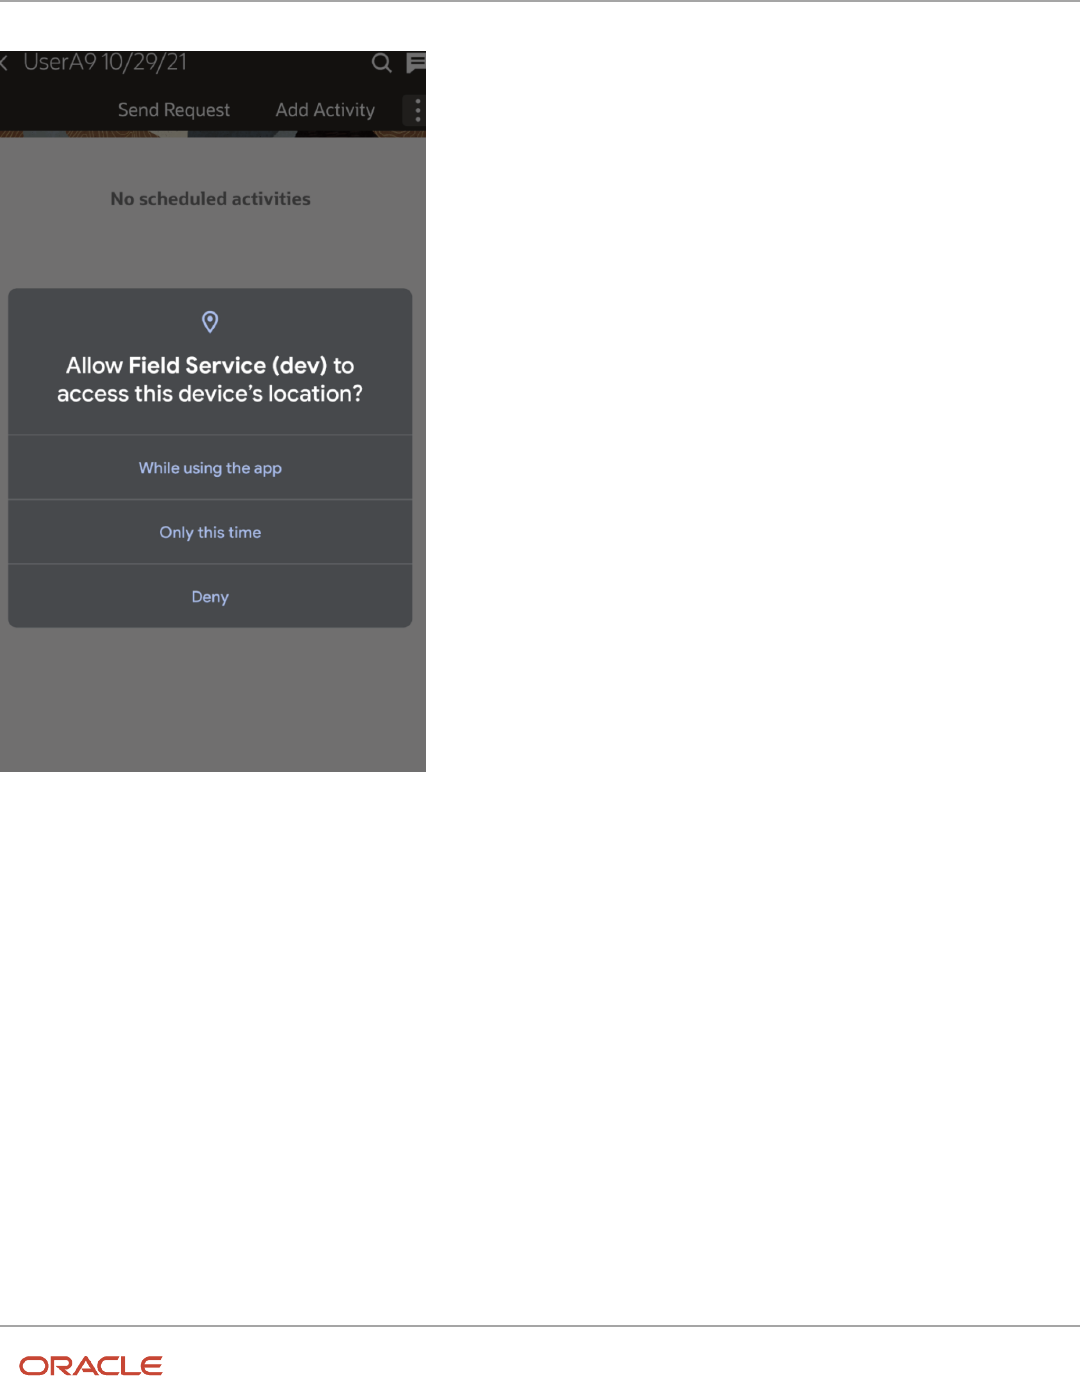
Location Permissions Notifications
The installed app needs location permissions to access the location of the field resource to provide accurate location-
based alerts and duration estimations.
If the Disable route activation when geolocation is not enabled on device check box is deselected or, if the location
services (GPS) is turned ON, and the field resource did not provide the location permissions, the application prompts
the user to provide appropriate permissions. A message displays the steps to provide the location permissions. To go to
settings, open location access -> app info -> choose Permissions and change the location permissions.
This screenshot shows the message on an Android device:
45
Field Service
Using Android and iOS Mobile Applications
Chapter 6
Using the Mobile Application
If you change the permissions from While using the app to Deny on an Android device, the 'Field Service is running'
notification is still displayed.
If your administrator has selected Disable route activation when geolocation is not enabled on device, the app
identifies that the location services (GPS) are not turned ON and location permissions are not provided. The message
displays notifies that you have to provide location permissions and turn ON the location services. In such cases, you
cannot Activate the route unless you provide the location permissions and turn ON the location services.
If your administrator has not selected Disable route activation when geolocation is not enabled on device, you are
not prevented from activating the route.
Set Camera Permissions to Use Barcode Scanner
The native apps (Android or iOS) must have the necessary permissions to access the device camera for the barcode
scanner functionality. When you try to use the Barcode scanner for the first time, if the camera permissions are missing,
the app prompts for the permission.
46

Field Service
Using Android and iOS Mobile Applications
Chapter 6
Using the Mobile Application
1. When you try to use the barcode scanner for the first time, a message to let Oracle Field Service access the camera to
capture photos and scan barcode or QR code appears.
2. For Android devices:
a. Click Allow to allow the barcode scanner plug-in to use the camera to scan the barcode.
Note: If you click Deny, the app displays the message Please provide access to camera in order to
capture photos and scan barcode/QR code, every time you access the barcode scanner from within
the app. Third-party camera apps are not supported starting with Android 11, so you must use the native
camera app.
b. Click Enable now to use the barcode scanner.
The camera permissions are set in the Android device and you can use the barcode scanner.
3. For iOS devices:
a. Click OK to allow the barcode scanner plug-in to use the camera to scan the barcode.
Note: If you click Don’t Allow, the app displays the message, Please provide access to camera in order
to capture photos and scan barcode/QR code, every time you access the barcode scanner from within
the app.
b. Click Enable now to use the barcode scanner.
The camera permissions are set in the iOS device and you can use the barcode scanner.
Launch Camera from a Custom Plug-In
If you try to launch the camera using an image file as an input type (for example, <input type="file" accept="image/*">),
it may not work in the installed app. The best practice is to use WebRTC to capture the image from the camera.
Work with Multiple Barcode Scanner
Let’s say you have added three barcode scanner fields, namely Serial Number, Model Number, and MAC Address, in the
same order. Use this procedure to scan these barcodes.
1. To start scanning the barcodes, click the barcode scanner icon next to the empty Serial Number field.
The app leads you through the process. When Serial Number is scanned, the app opens up the camera.
2. Scan the next element, Model Number, which is located below Serial Number.
Model Number is displayed on the camera and the result of the scanning is shown on the page.
3. Scan all the barcodes and fill the empty elements in the section.
You can interrupt the scanning any time, rescan a scanned field, or continue scanning the rest of the empty fields in
the section.
Note: Scanning multiple barcodes works only for empty fields. The app skips the fields that have been scanned
and moves to the next empty field in the section automatically.
47

Field Service
Using Android and iOS Mobile Applications
Chapter 6
Using the Mobile Application
Save Image Metadata from Camera Images
The installed app automatically saves the time stamp and GPS coordinates in the metadata of the images taken from
the camera in iOS and Android native apps. Both coordinates are stored in the metadata of the images in the EXIF
format.
Android iOS
Browser application No limitations Limited ability to store GPS coordinates
Native application No limitations No limitations
Note: Due to the limitations imposed by Apple, you cannot collect GPS coordinates for an image while using the
Oracle Field Service Browser application on an iOS device. However, there is a way to collect geo-coordinates in the
metadata of the images for the browser applications running on iOS. You can take an image using the camera, save
the image in the gallery, select photos from the gallery and attach them to a form.
• Timestamp Metadata
The timestamp is always saved in ISO format with the UTC zone offset for all the images taken from a camera.
You can obtain the timestamp from these metadata tags:
◦
DateTimeOriginal: Date and time when the original image was taken.
◦
DateTimeDigitized: Date and time when the image was stored in .
◦
OffsetTimeOrigin: Time zone of the original date and time.
◦
OffsetTimeDigitized: Time zone of the digitized date and time.
• GPS Coordinates Metadata
Enable these functions on your mobile devices to save the GPS coordinates in metadata:
◦
Enable the Geolocation setting in General settings.
◦
Enable the Location setting in Camera settings.
You can obtain the location from these metadata tags:
◦
GPSLatitudeRef: Indicates whether the latitude is North or South. The ASCII value 'N' indicates north
latitude, and 'S' is south latitude.
◦
GPSLatitude: Indicates the latitude. The latitude is expressed as three rational values as dd/1, mm/1, ss/1.
When degrees and minutes are used, for example, fractions of minutes are expressed up to two decimal
places, then the format is dd/1, mmmm/100, 0/1.
◦
GPSLongitudeRef: Indicates whether the longitude is east or west. ASCII 'E' indicates east longitude and
'W' is west longitude.
◦
GPSLongitude: Indicates the longitude. The longitude is expressed as three rational values as ddd/1,
mm/1, ss/1. When degrees and minutes are used, for example, fractions of minutes are expressed up to
two decimal places, the format is ddd/1, mmmm/100, 0/1.
48

Field Service
Using Android and iOS Mobile Applications
Chapter 6
Using the Mobile Application
Follow these steps to save image metadata:
1. For Android users:
a. Open the Camera app.
b. Tap Setting of the camera app.
c. Enable the Location tag or Save location option.
2. For iOS users:
a. Open Settings and go to the Privacy option.
b. Enable the Location services option.
c. Tap the Camera option and select While Using the App option.
What to do next
Note: Location and time stamp are an integral part of images. You should download images to your external
applications through a Core API or Daily Extract and retrieve the information from the metadata. Currently, doesn't
show this information either in UI nor provides it separately through public APIs.
Change the Name of Your Mobile Instance
You can select a different Oracle Field Service app (or Oracle Field Service Cloud app) instance. For example: Move from
a TEST name to a PROD name.
To change the Oracle Field Service app (or Oracle Field Service Cloud app) instance:
1. Open the installed application.
2. Navigate to the OFSC Mobility Instance page.
3. In the instance name field, enter the name of the instance you want to switch and then tap OK.
Create Shortcuts to Mobile Instances
You can create shortcuts to open the installed app and load the desired instance automatically.
This option is supported only in the mobile app for Android.
To create the shortcut, you must create and download an XML file on the device. The XML file contains the following
content nodes:
• <instance> — *required*, root node
• <name> — *required*, child of <instance>, contains the Name of the shortcut to be displayed
• <url> — *required*, child of <instance>, contains the complete URL of the desired Mobility Instance
Example:
<?xml version="1.0" ?>
<instance>
49
Field Service
Using Android and iOS Mobile Applications
Chapter 6
Using the Mobile Application
<name>Demo</name>
<url>http://demo.fs.ocs.oraclecloud.com/m</url>
</instance>
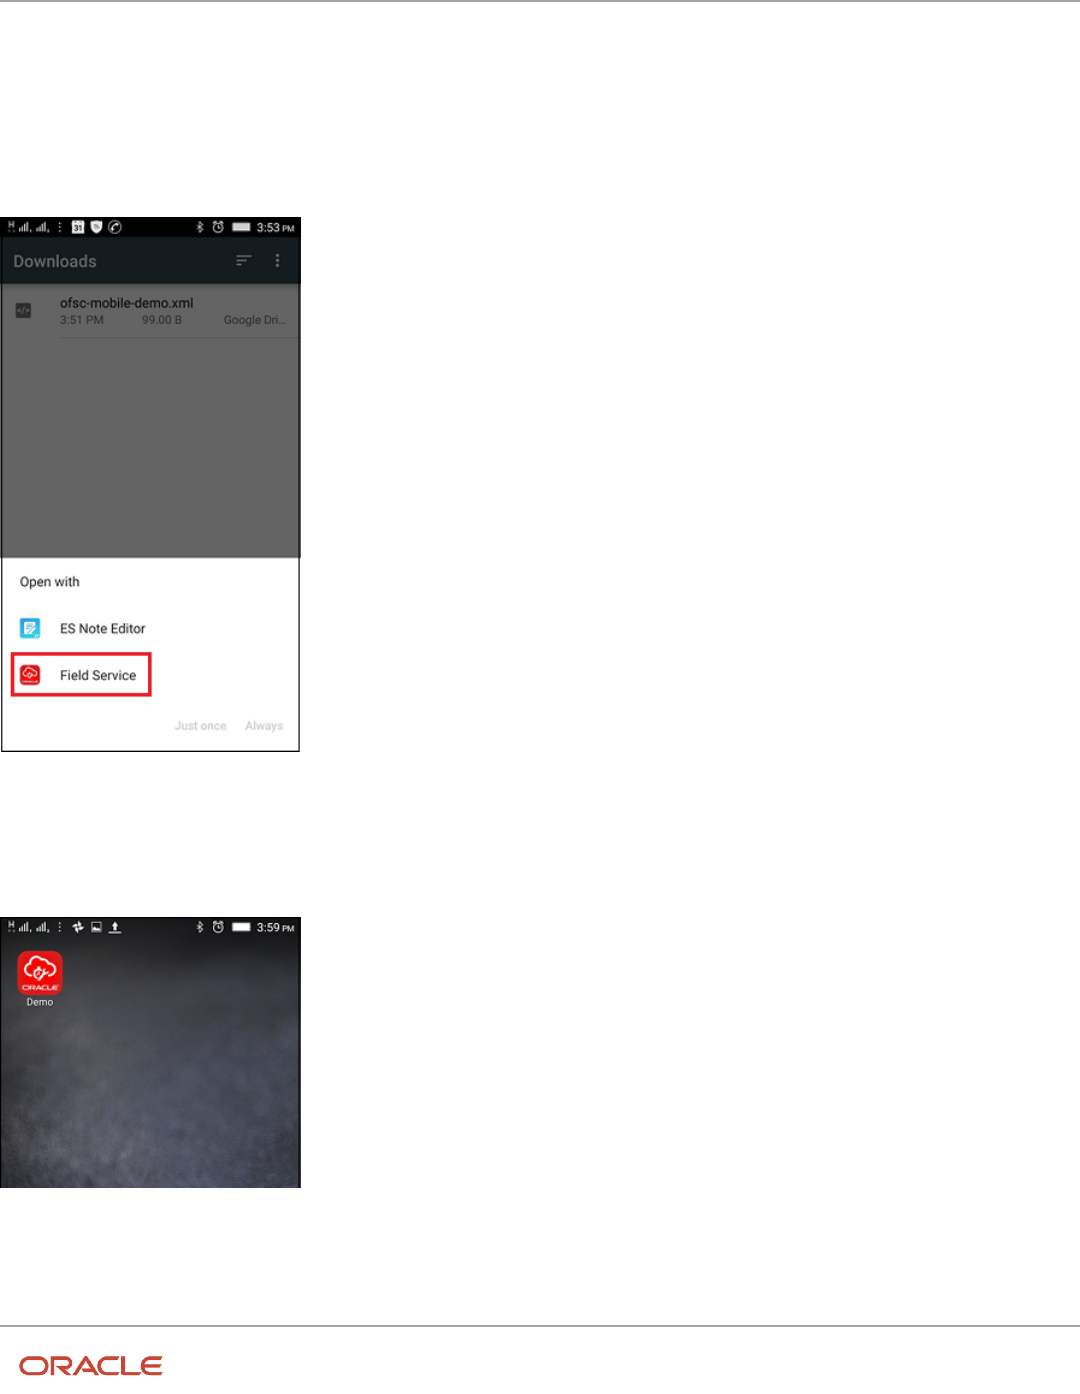
After downloading the XML file, launch it and select the OFSC Mobile app (Field Service) option.
The Field Service option appears as shown in this screenshot:
When the app opens, it loads the instance specified the in the <url> node.
In addition, it creates the shortcut on your device. When you click the shortcut, the configured Mobility instance opens.
50

Field Service
Using Android and iOS Mobile Applications
Chapter 6
Using the Mobile Application
Prompt Mobile Application Users to Provide Rating and
Feedback
Oracle Field Service seeks users' feedback on the installed app. The feedback helps in knowing their perceptions and
determining how we can further improve the app.
By collecting rating and feedback, the mobile app can:
• Gather information about what a user truly appreciates about it.
• Identify the user's pain points that may be addressed in the future.
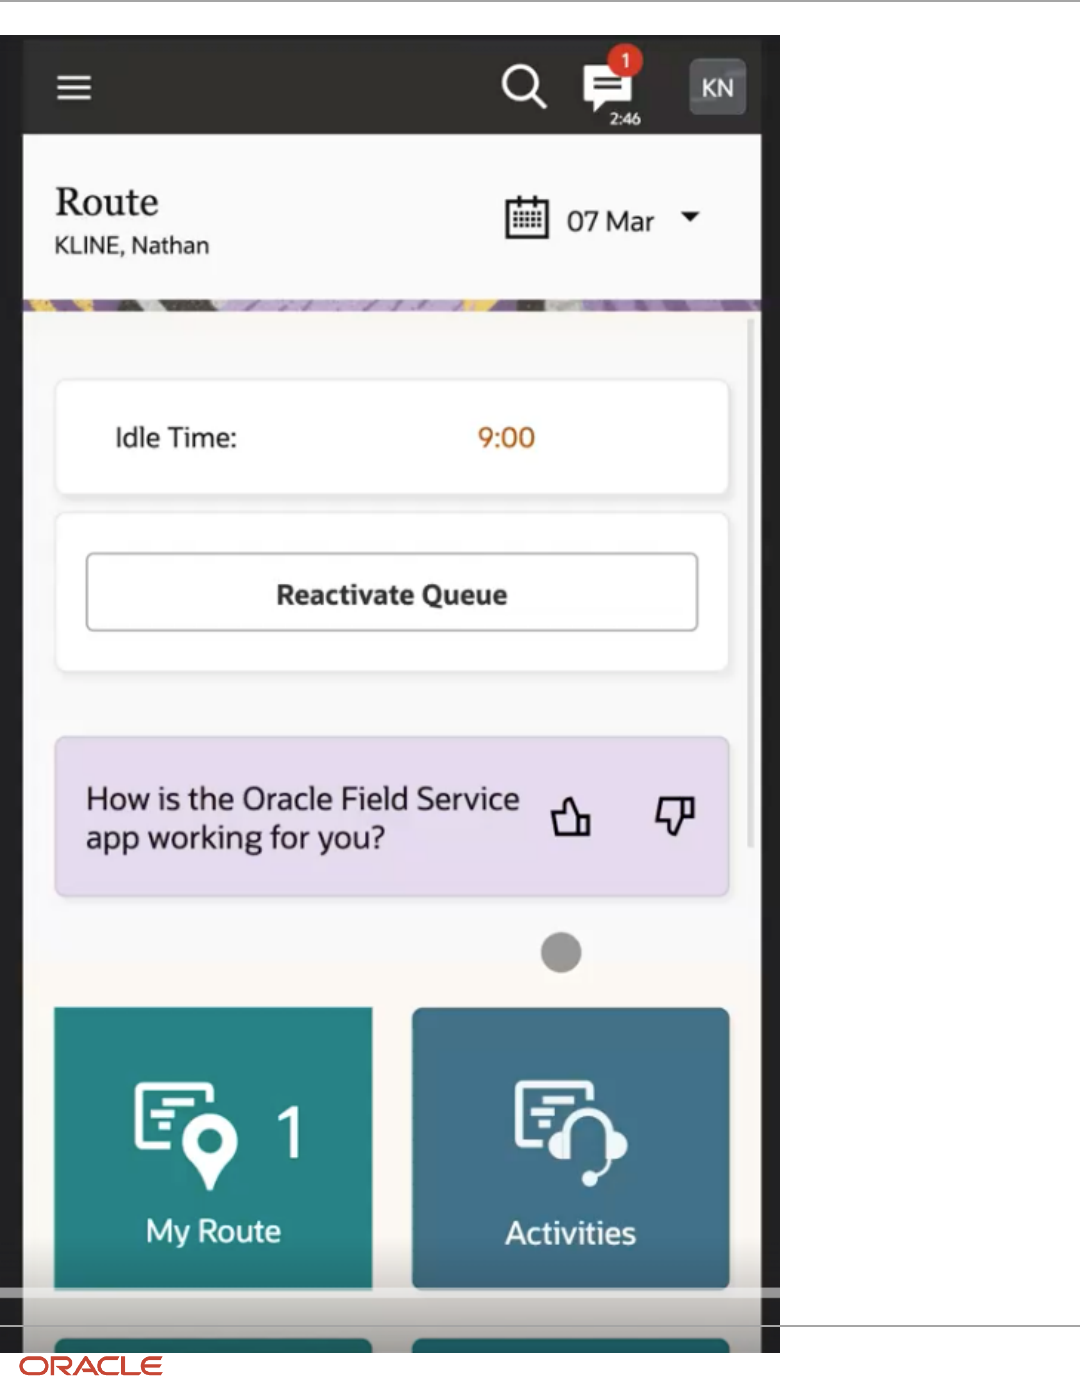
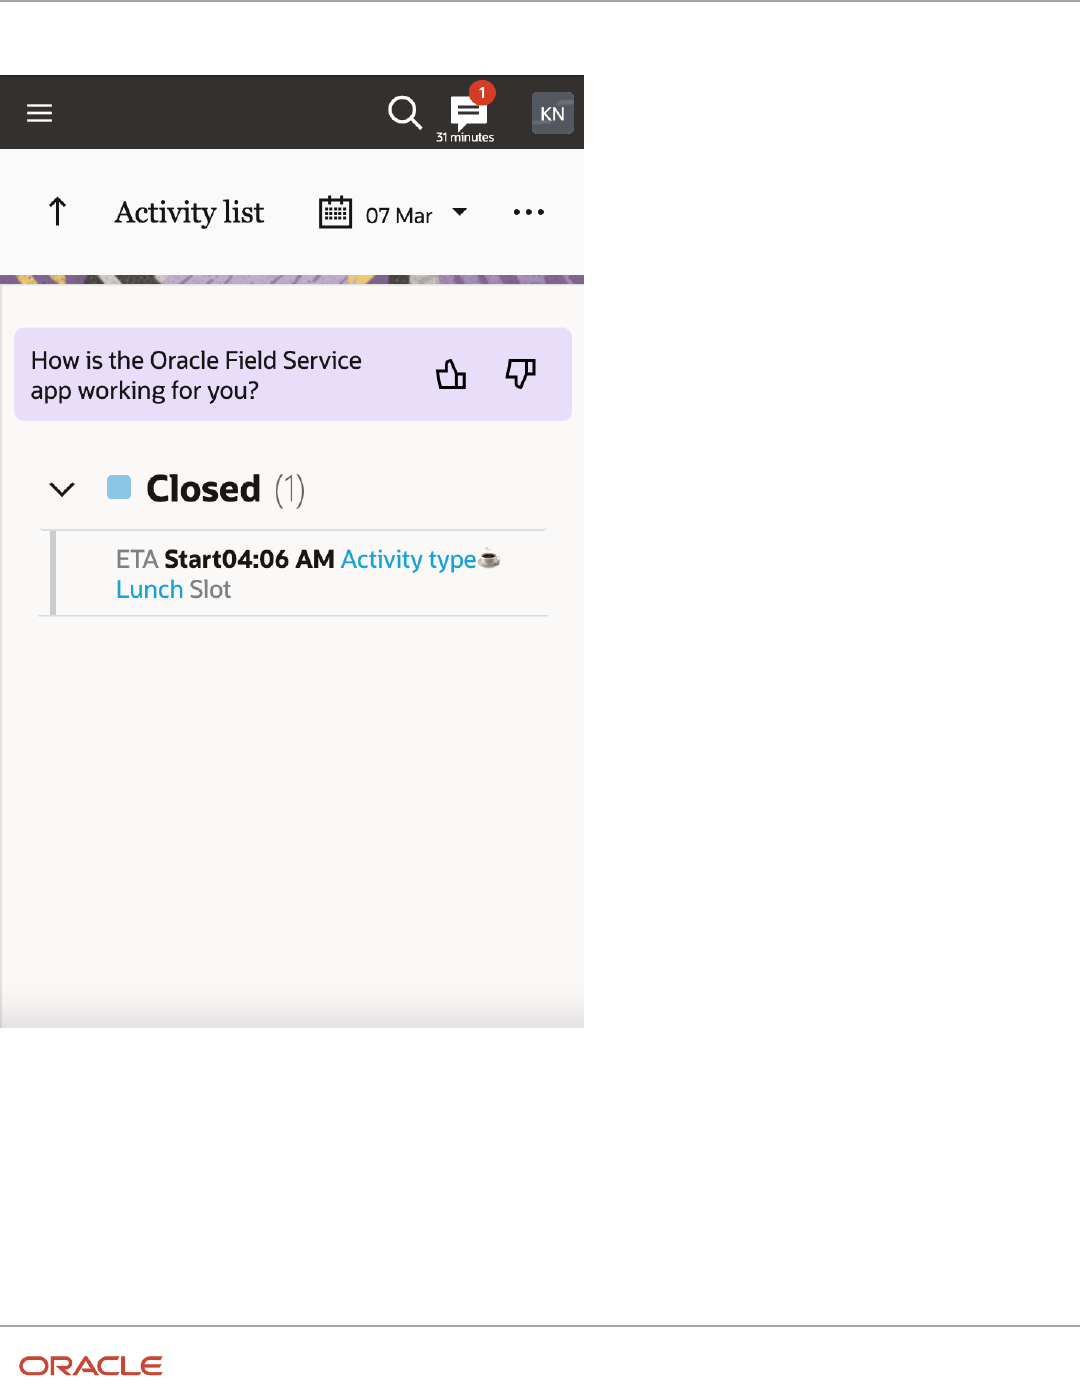
On either the My Route page or the Activity List page, a banner is displayed, only after a particular version of the
mobile app is used for seven days. The banner is either displayed at the end of the day when users are deactivating their
route or displayed when the app observes that a user has some idle time. If a user doesn't interact with the banner, it
automatically disappears at the end of the day (when there's a date change for the user). The banner reappears after
seven days and this can happen a maximum of ten times. Once the user has interacted with the banner, it doesn't
appear again.
On the banner, the users can respond whether they like (by clicking the thumbs up button ) or don't like (by clicking on
the thumbs down button ) the mobile application.
This screenshot displays the banner on Route showing thumbs up and thumbs down buttons:
51
Field Service
Using Android and iOS Mobile Applications
Chapter 6
Using the Mobile Application
52
Field Service
Using Android and iOS Mobile Applications
Chapter 6
Using the Mobile Application
This screenshot displays the banner on Activity List showing thumbs up and thumbs down buttons:
When using the Android or iOS application, if a user 'likes' the app, they see a prompt message to rate it in the relevant
app store.
If the user likes the app and accesses the application through a browser, they see a prompt message to provide
additional feedback.
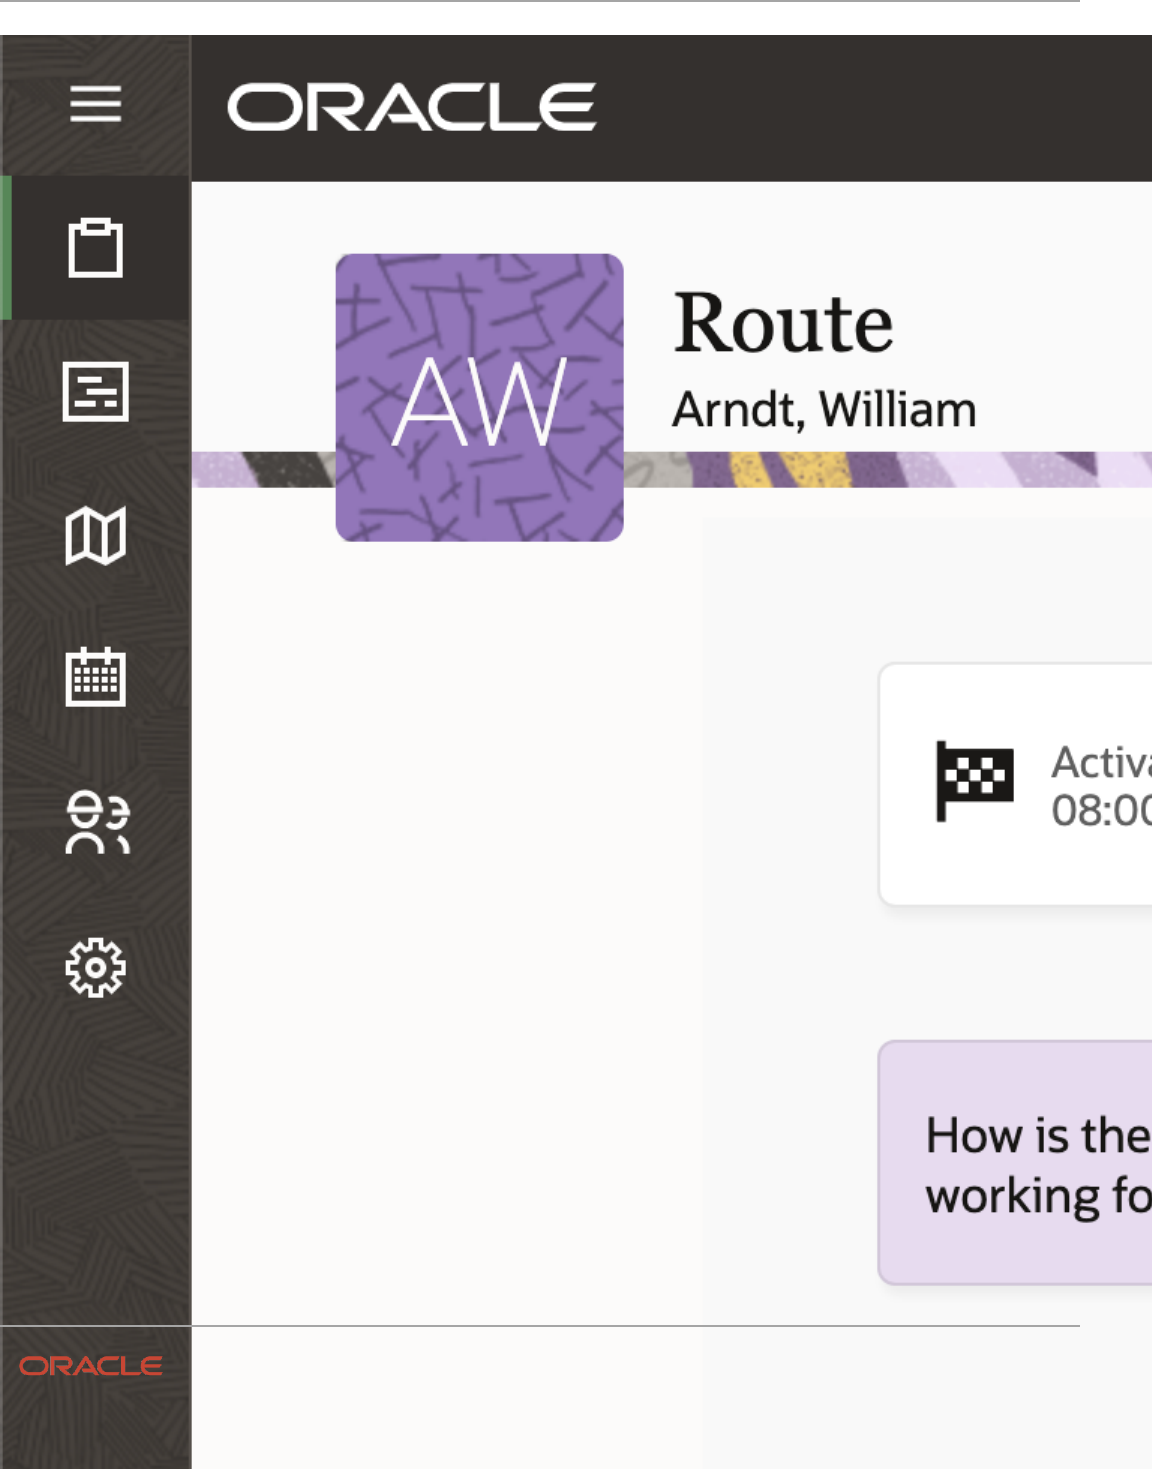
This screenshot displays the banner on Route showing thumbs up and thumbs down buttons in large screen devices:
53
Field Service
Using Android and iOS Mobile Applications
Chapter 6
Using the Mobile Application
54

Field Service
Using Android and iOS Mobile Applications
Chapter 6
Using the Mobile Application
If a user doesn't like the app, they see a prompt message to provide feedback regarding what can be improved.
This screenshot displays the banner on Activity List showing the thumbs up and thumbs down buttons in large screen
devices:
55
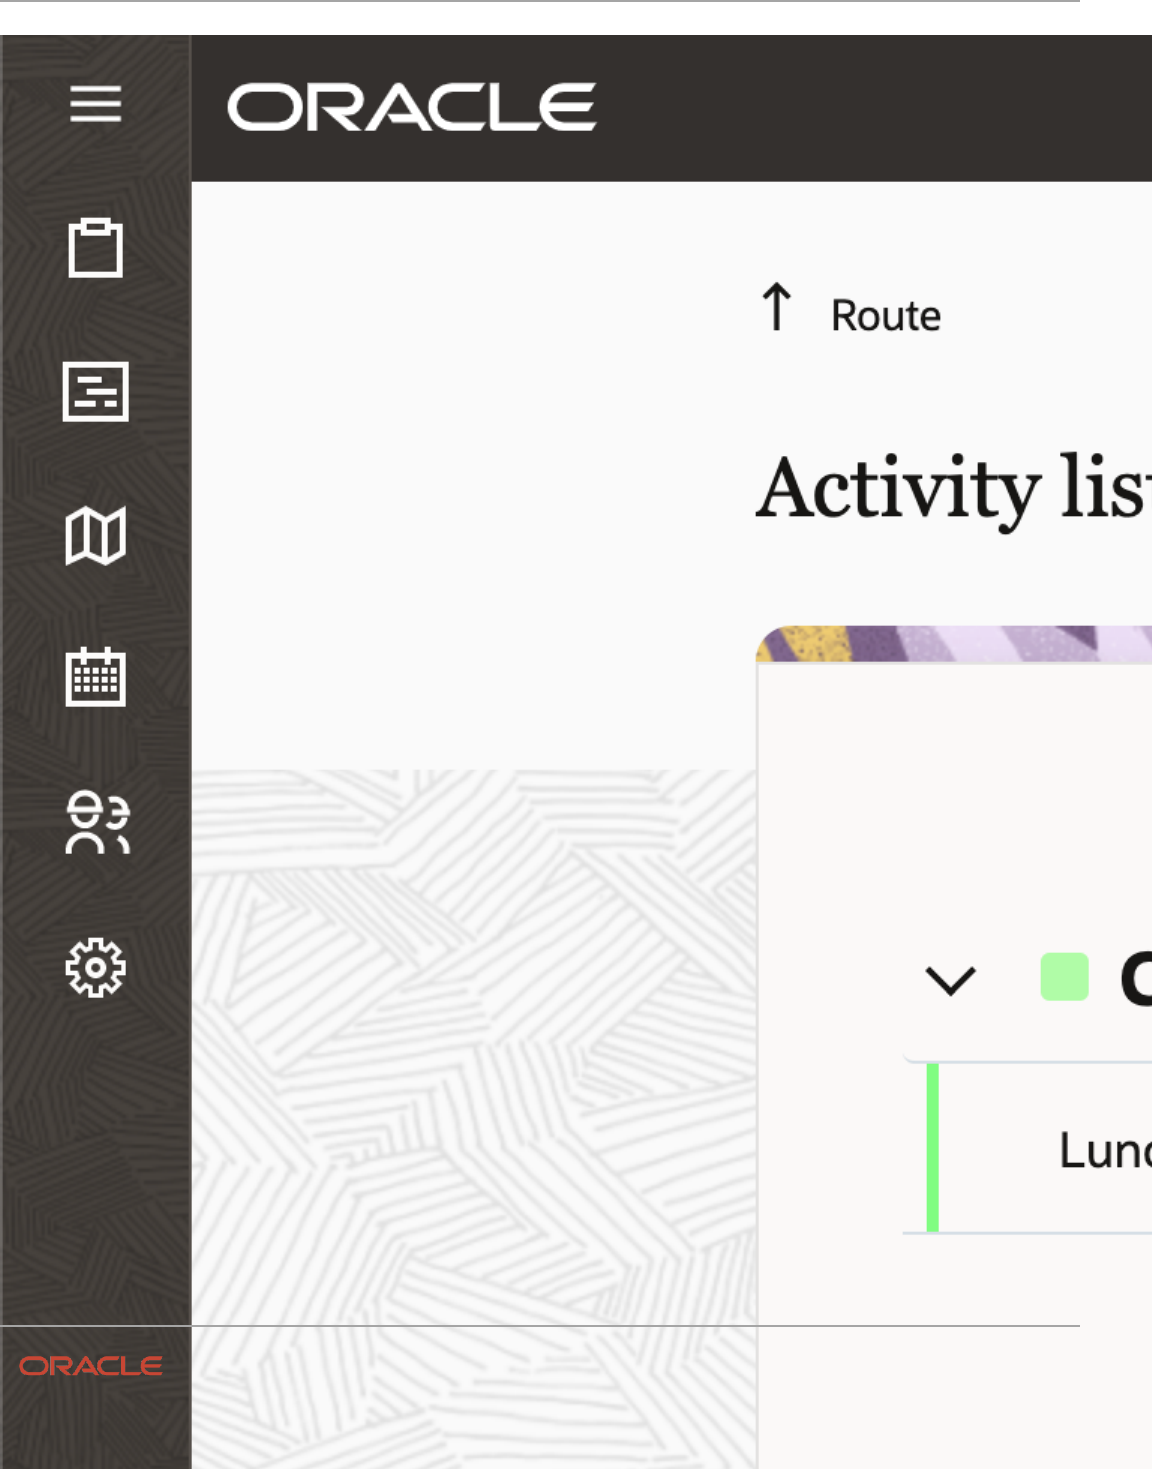
Field Service
Using Android and iOS Mobile Applications
Chapter 6
Using the Mobile Application
56

Field Service
Using Android and iOS Mobile Applications
Chapter 6
Using the Mobile Application
The user experience gaps gathered as a result helps Oracle provide you with the best possible user experience. Your
administrator can enable this feature by selecting Allow user feedback on the Configuration > User Types > General
tab.
Prompt Mobile Application Users to Upgrade Mobile
Application from Previous Versions
A number of mobile app (iOS, Android) users may be using older versions, which are generally less stable and contain
fewer features. The app automatically prompts such users to update from previous versions to the latest version.
The mobile app performs these steps:
1. Identifies the version of the installed app when the user has successfully logged in.
57
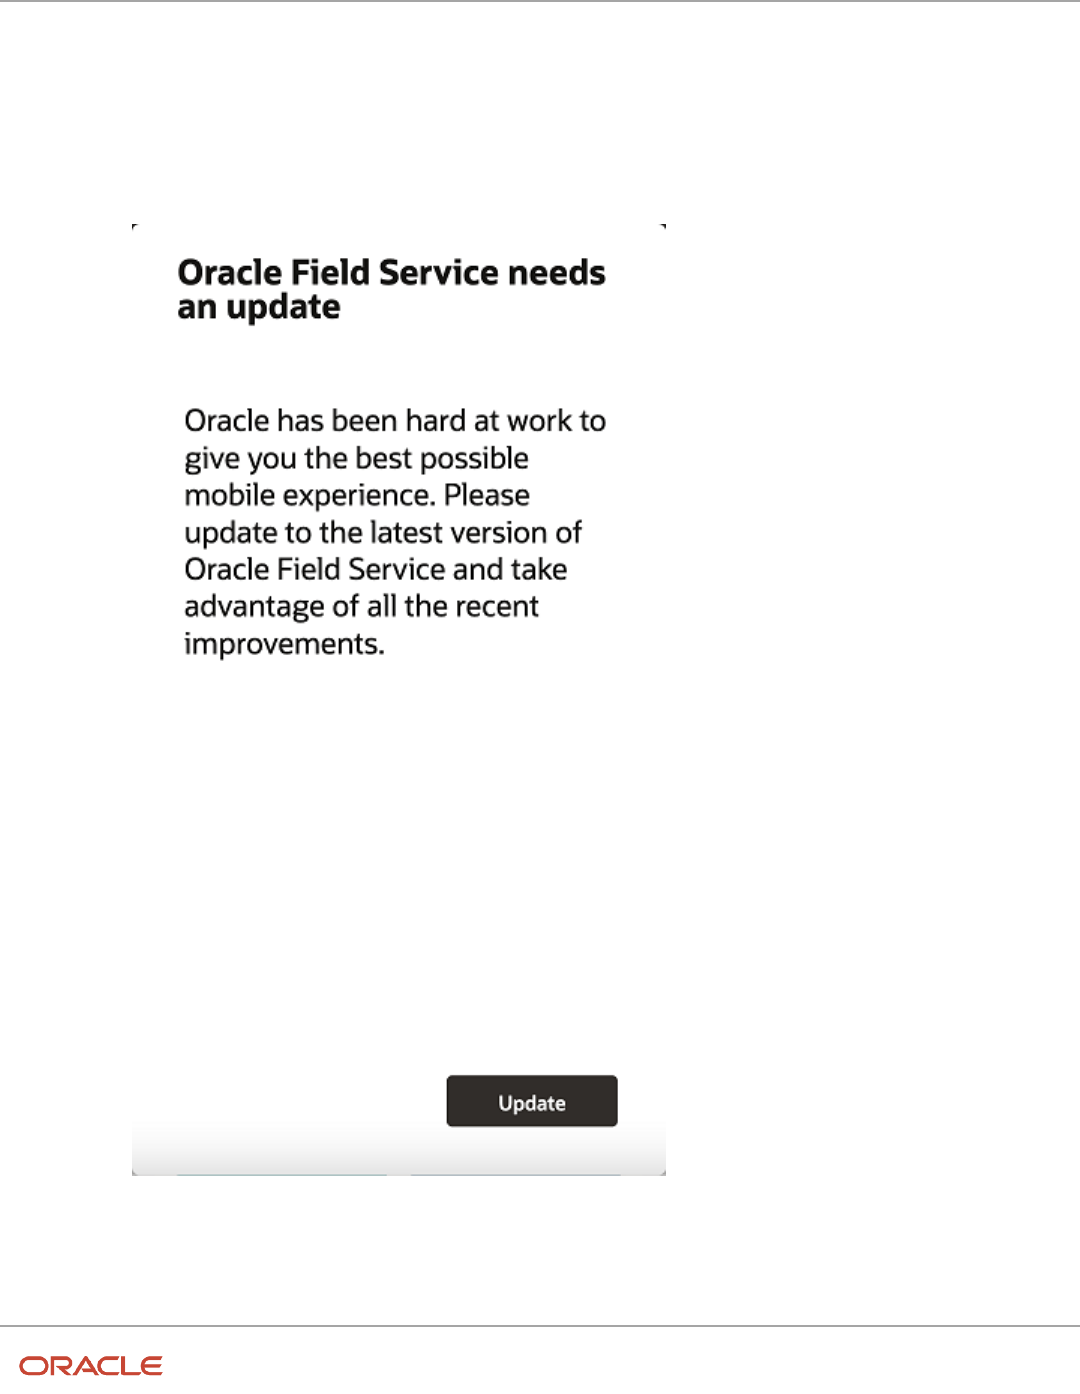
Field Service
Using Android and iOS Mobile Applications
Chapter 6
Using the Mobile Application
2. Compares the user's version to the latest version available in the respective app stores.
◦
If the user's version of the mobile app is one of the six most recent major versions, the user does not see
any change in the behavior and can continue to use the app.
◦
For versions older than that, the app displays a message that blocks the use of the app unless they
update it to the latest version.
This screenshot shows the upgrade notification displayed on Android/ iOS app on mobile devices:
This screenshot shows the upgrade notification displayed on tablets and iPADs:
58
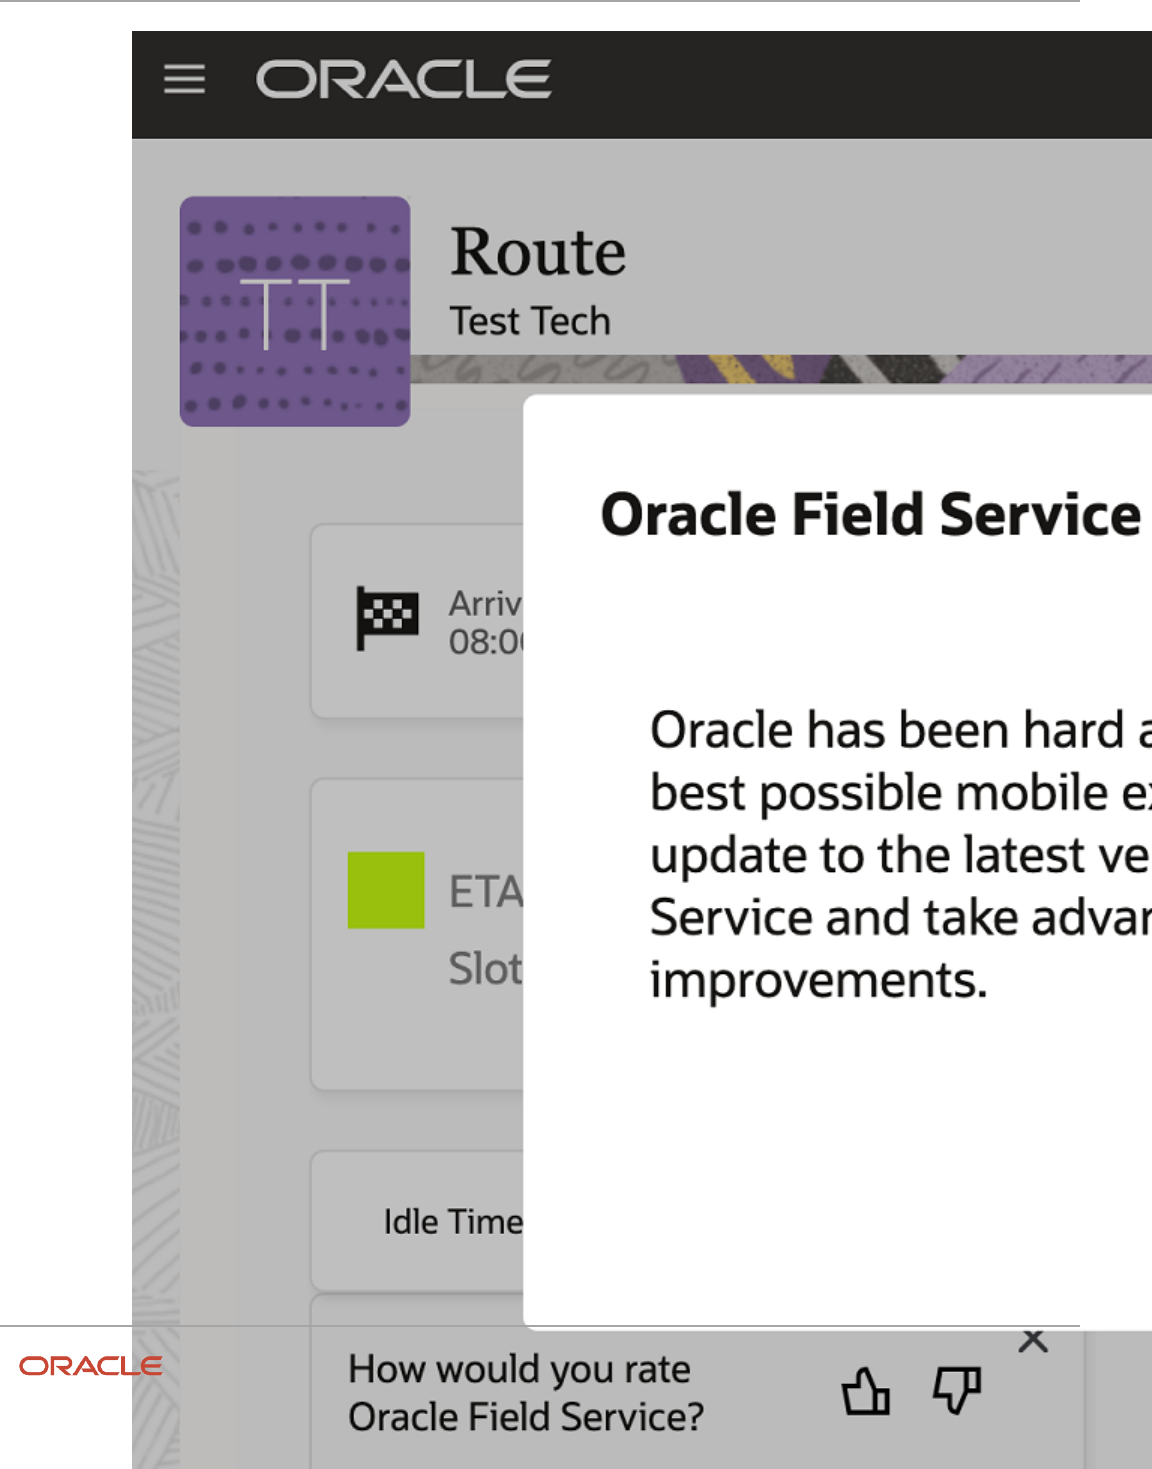
Field Service
Using Android and iOS Mobile Applications
Chapter 6
Using the Mobile Application
59

Field Service
Using Android and iOS Mobile Applications
Chapter 6
Using the Mobile Application
Troubleshoot Your Mobile Application
This section lists a set of troubleshooting steps for Oracle Field Service mobile app (or Oracle Field Service Cloud app).
1. Activity and Inventory is not updated in my instance
◦
Check to see if the instances are the same (Mobile and Manage).
2. Coordinates were not gathered
◦
Verify whether the resource has logged in and their route is active.
◦
If using a Mobile Device Management (MDM) solution, ensure that the geolocation services are available.
3. Requirements when using MDM software
◦
The application must not prevent a user from starting or launching a web application.
◦
These Android permissions MUST NOT be blocked:
- precise location (GPS and network based)
- full network access
- view network connections
- run at startup
60

Field Service
Using Android and iOS Mobile Applications
Revision History
Revision History
This document will continue to evolve as existing sections change and new information is added.
Date What’s Changed Notes
August 2022 This topic is added:
• Capture Images With In-App Camera
May 2021 These topics were added:
• Prompt Mobile Application Users to
Provide Rating and Feedback
• Prompt Mobile Application Users to
Upgrade Mobile Application from Previous
Versions
February 2022 This topic is added:
• Log In Using SSO
61

Field Service
Using Android and iOS Mobile Applications
Revision History
62
